Handleiding voor creators
Van account tot uitbetaling: profiel en pakketten instellen, aanvragen beantwoorden, leveren en laten afrekenen. Deze handleiding loopt de weg één keer door. De afbeeldingen komen uit het draaiende panel.
Deze handleiding als PDF1. Account aanmaken en wegwijs worden
Je werkplek is het creatorpanel. Daar staan profiel, pakketten, opdrachten en afrekeningen — de pagina die merken zien, ontstaat er vanzelf uit.
Stap 1.1
Account aanmaken
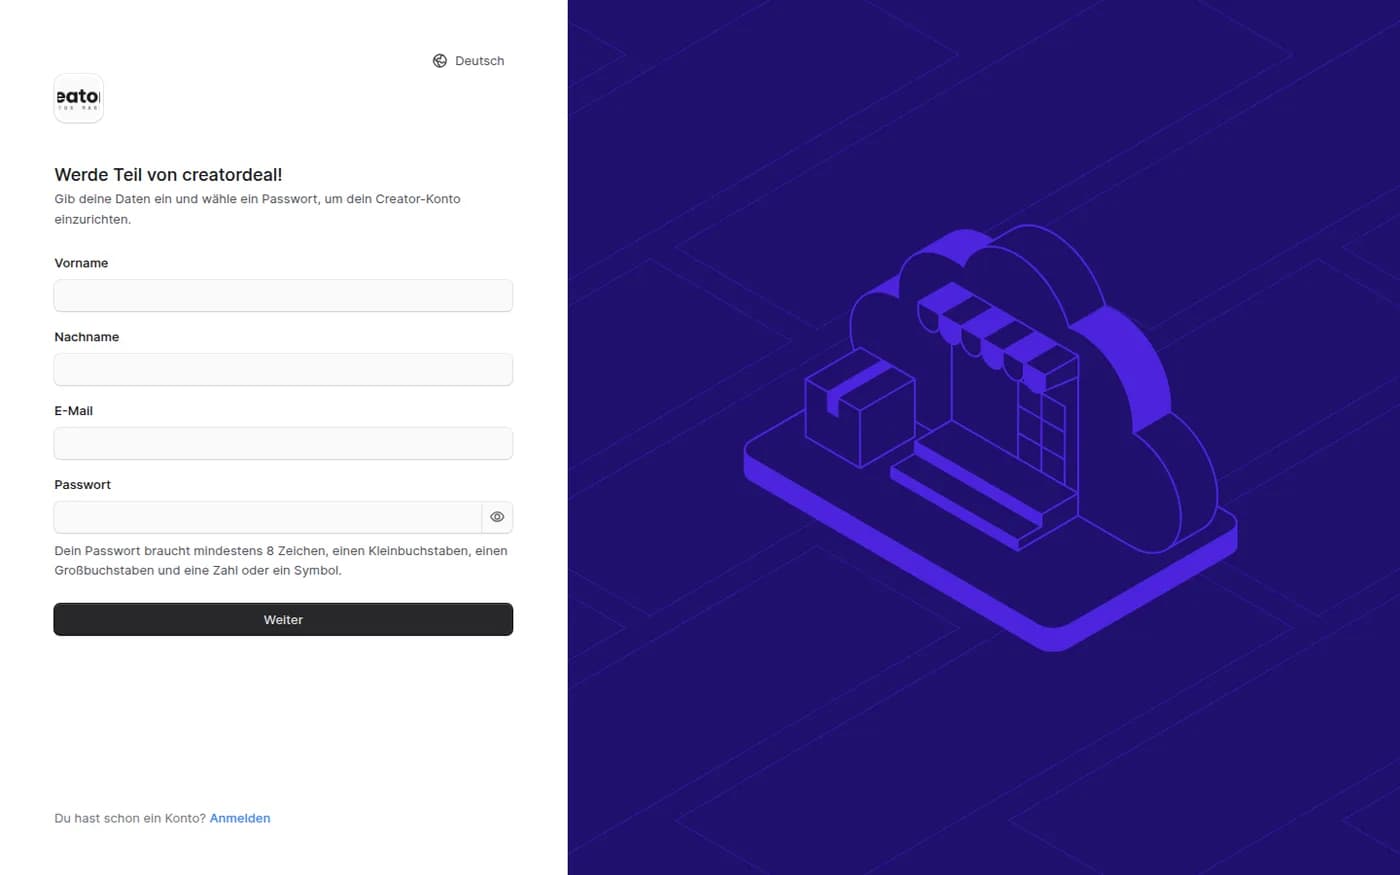
Voornaam, achternaam, e-mail en een wachtwoord — meer heeft de eerste stap niet nodig. De taal van het panel stel je rechtsboven in; deze geldt alleen voor jou.
Stap 1.2
Het dashboard
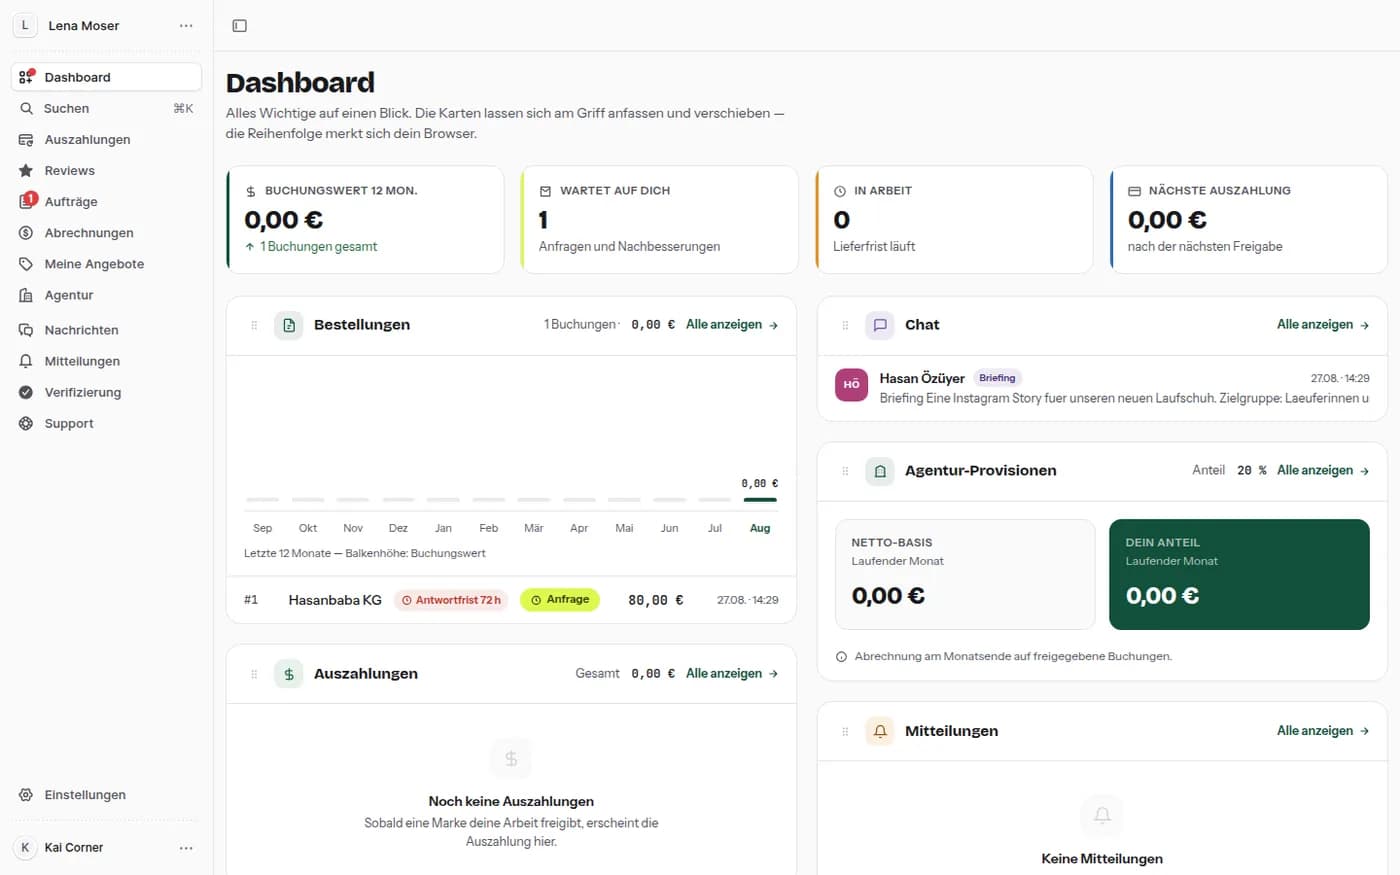
Bovenaan vier cijfers: boekingswaarde van de laatste twaalf maanden, wat op je wacht, wat in behandeling is, wat als volgende wordt uitbetaald. 'Wacht op jou' is het punt waar een termijn loopt. De kaarten eronder pak je bij de greep vast en verschuif je.
2. Je profiel
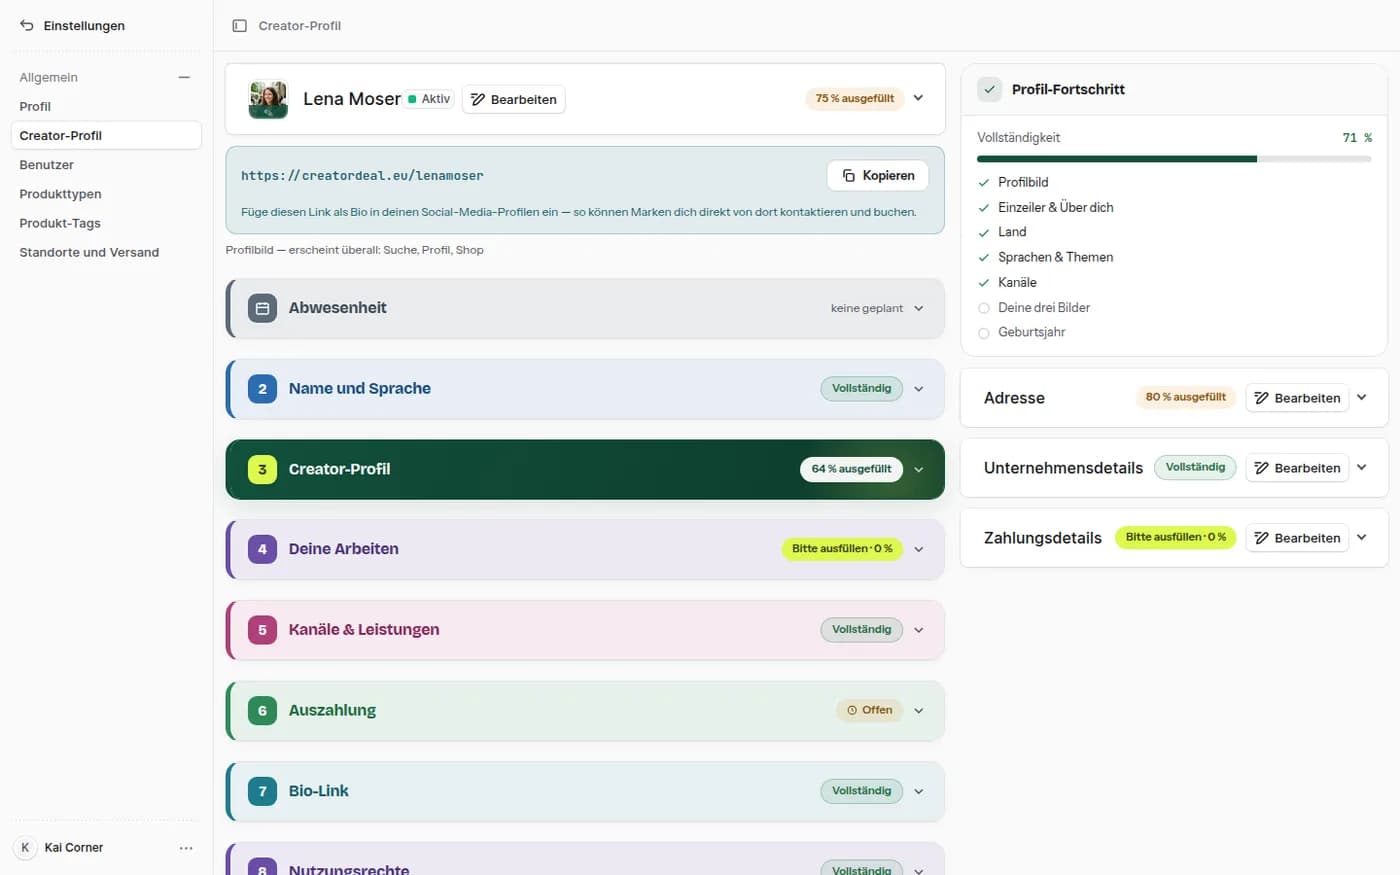
Het profiel is verdeeld in uitklapkaarten, en elke kaart zegt zelf hoe ver ze is ingevuld. Rechts staat de voortgang met wat nog ontbreekt — merken zoeken precies op deze gegevens.
Stap 2.1
De uitklapkaarten
Naam en taal, creatorprofiel, je werk, kanalen en diensten, uitbetaling, bio-link, gebruiksrechten, afwezigheid. Helemaal bovenaan staat je bio-link om te kopiëren.
Stap 2.2
Afbeeldingen en teksten
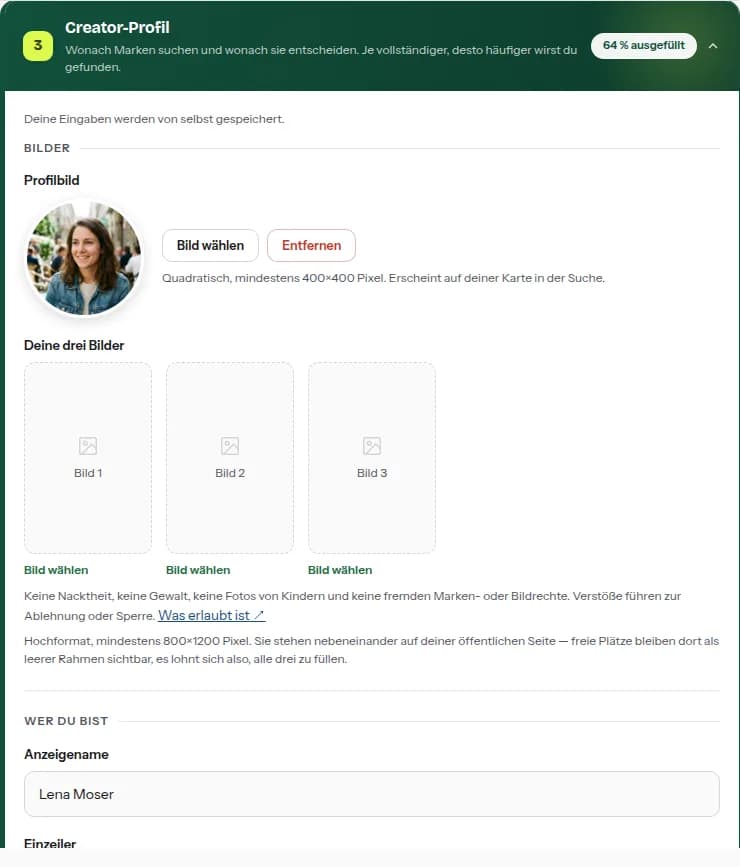
Een vierkante profielfoto en drie staande afbeeldingen, plus weergavenaam, oneliner en 'Over jou'. Wat op de afbeeldingen niet is toegestaan, staat direct bij de velden.
3. Kanalen en diensten
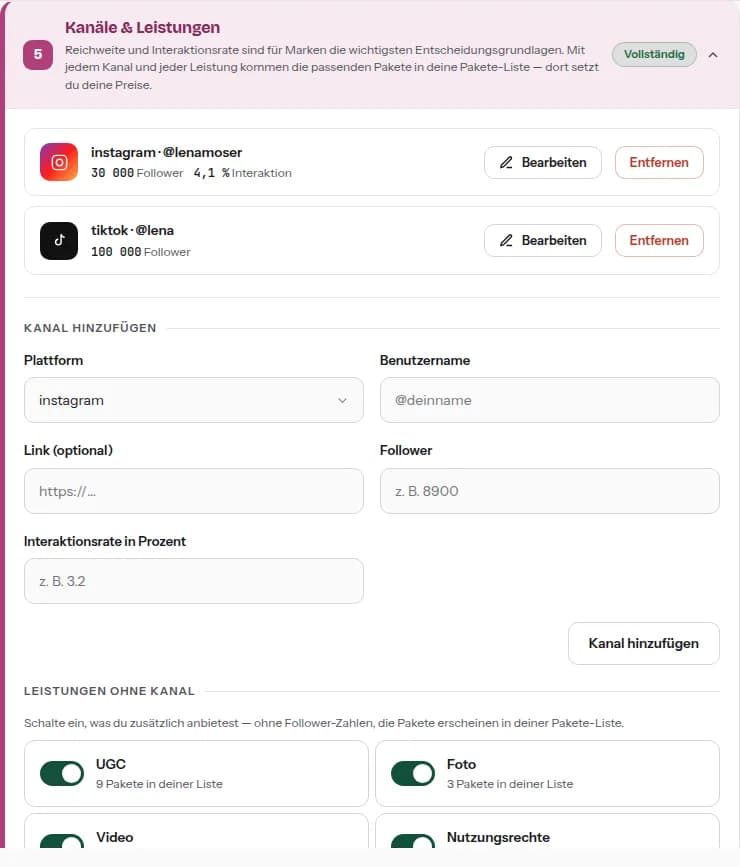
Bereik en interactieratio per kanaal zijn voor merken de belangrijkste beslissingsbasis. Elk ingevoerd kanaal ontgrendelt bovendien de bijpassende pakketten.
Stap 3.1
Kanaal toevoegen
Platform, gebruikersnaam, volgers en interactieratio; een link naar het profiel is vrijwillig. Daaronder staan de diensten zonder kanaal — UGC, foto, video, gebruiksrechten. Die zet je aan met een schakelaar.
4. Pakketten en prijzen
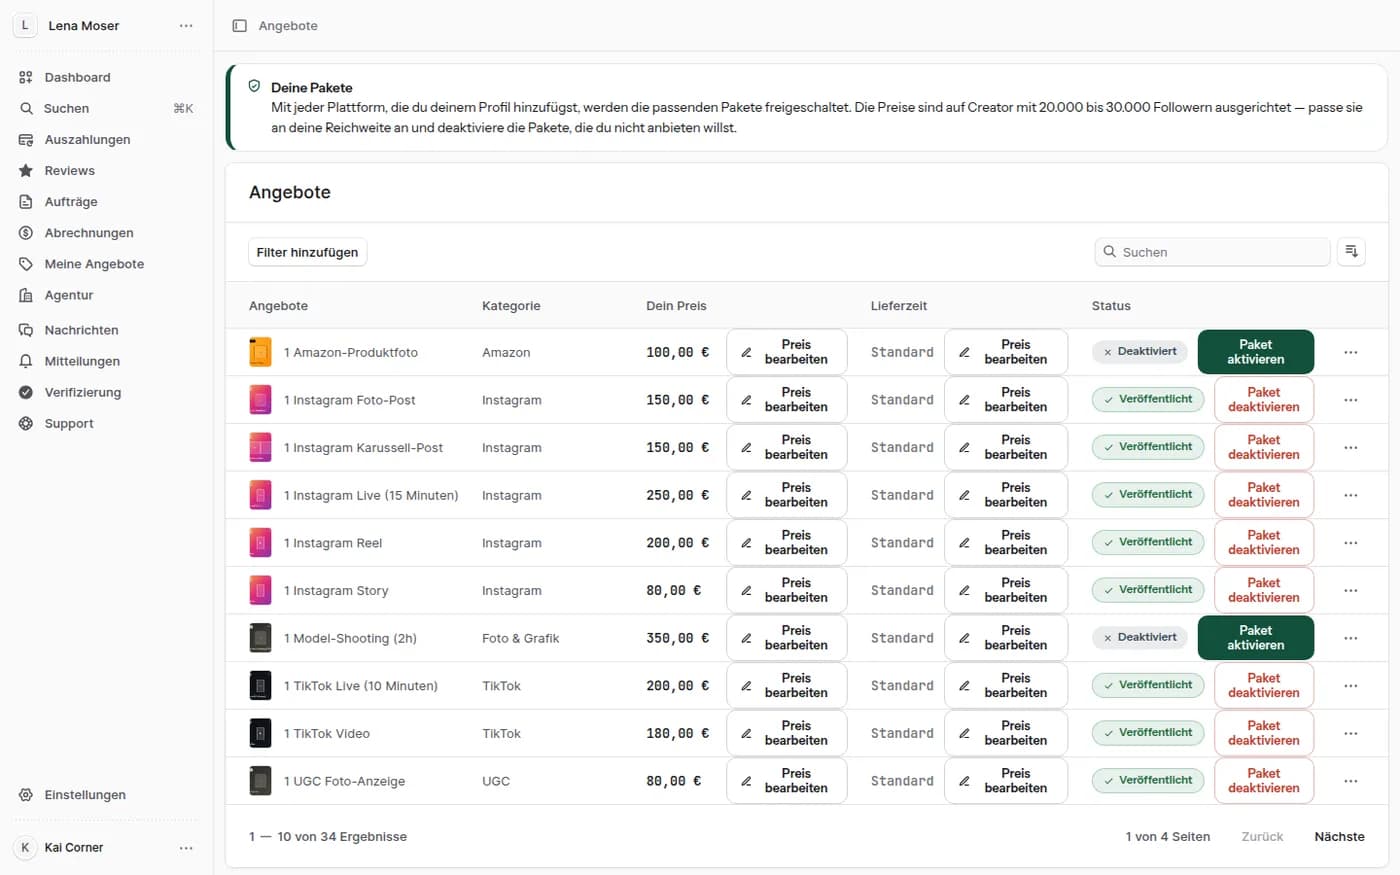
Welke pakketten er zijn, ligt vast; wat ze kosten, bepaal jij. Een pakket dat uitstaat, ziet geen enkel merk.
Stap 4.1
Prijzen instellen
Per rij categorie, jouw prijs, levertijd en status — plus 'Prijs bewerken' en de schakelaar om te activeren. De standaardwaarden zijn berekend op middelgroot bereik; wie meer bereik heeft, gaat erboven zitten.
Stap 4.2
De prijslijst voor gebruiksrechten
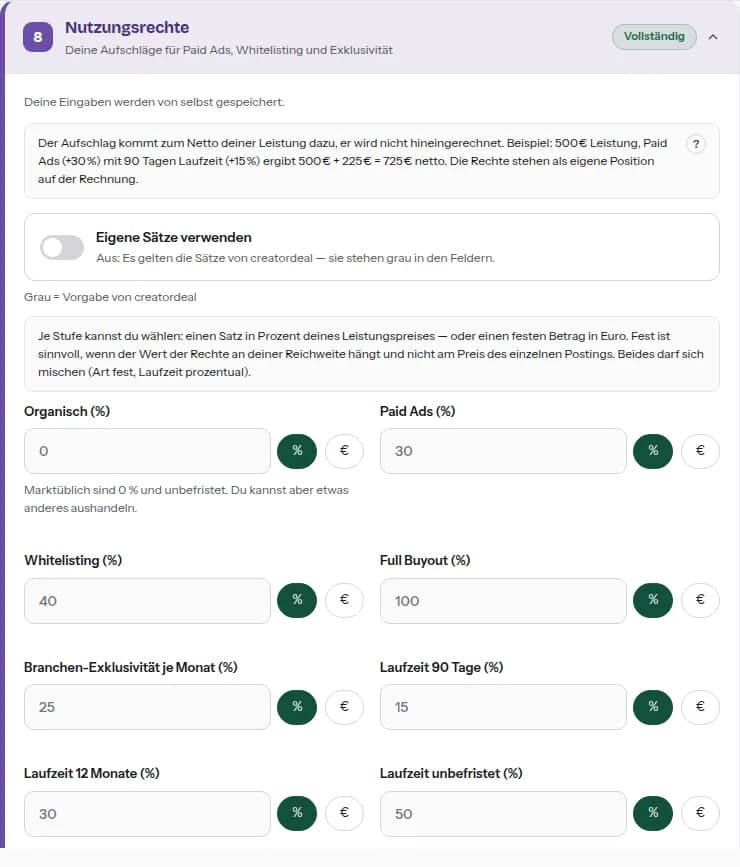
Wat paid ads, whitelisting, full buyout, exclusiviteit en de looptijden bij jou kosten — als percentage op de prestatie of als vast bedrag. Zonder eigen tarieven gelden de grijs ingevulde standaarden van creatordeal.
5. De bio-link
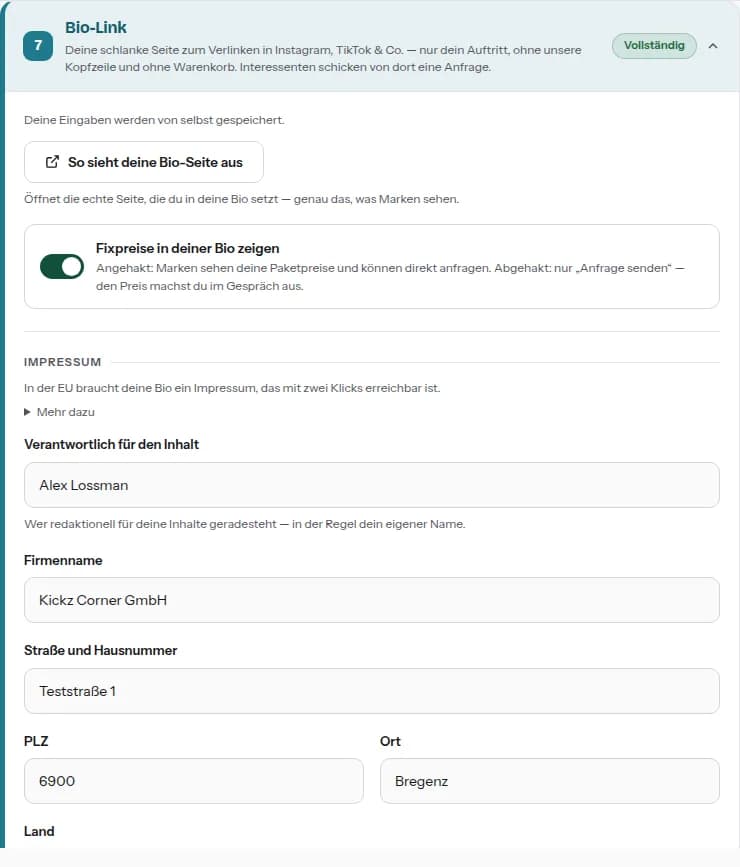
Een slanke pagina zonder shop-header, bedoeld voor de bio op Instagram, TikTok en co. Van daaruit schrijven ook merken zonder account je aan.
Stap 5.1
Pagina instellen
Een schakelaar bepaalt of daar jouw vaste prijzen staan of alleen 'Aanvraag versturen'. Daaronder het colofon: in de EU moet het vanaf de bio-pagina met twee klikken bereikbaar zijn.
6. Je opdrachten
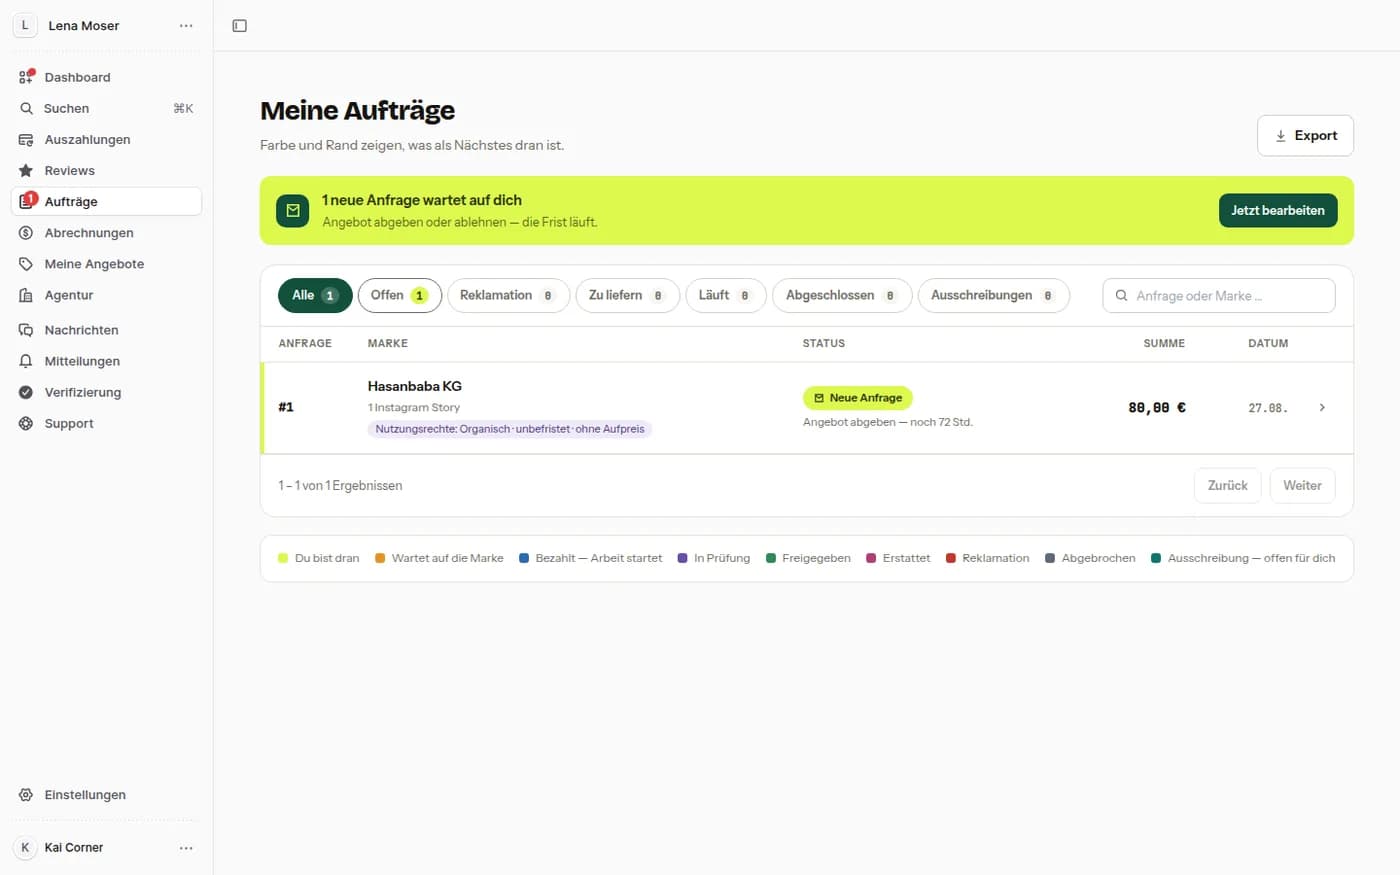
Eén lijst voor alles. Kleur en rand tonen wat als volgende aan de beurt is; de tabbladen erboven scheiden open, te leveren, lopend en afgerond.
Stap 6.1
De opdrachtenlijst
Bovenaan de balk met wat dringend is — nieuwe aanvragen met lopende termijn, open reclamaties. Elke rij toont merk, pakket, afgesproken gebruiksrechten, status, resterende termijn en bedrag; de legenda eronder verklaart de kleuren.
7. Een aanvraag lezen
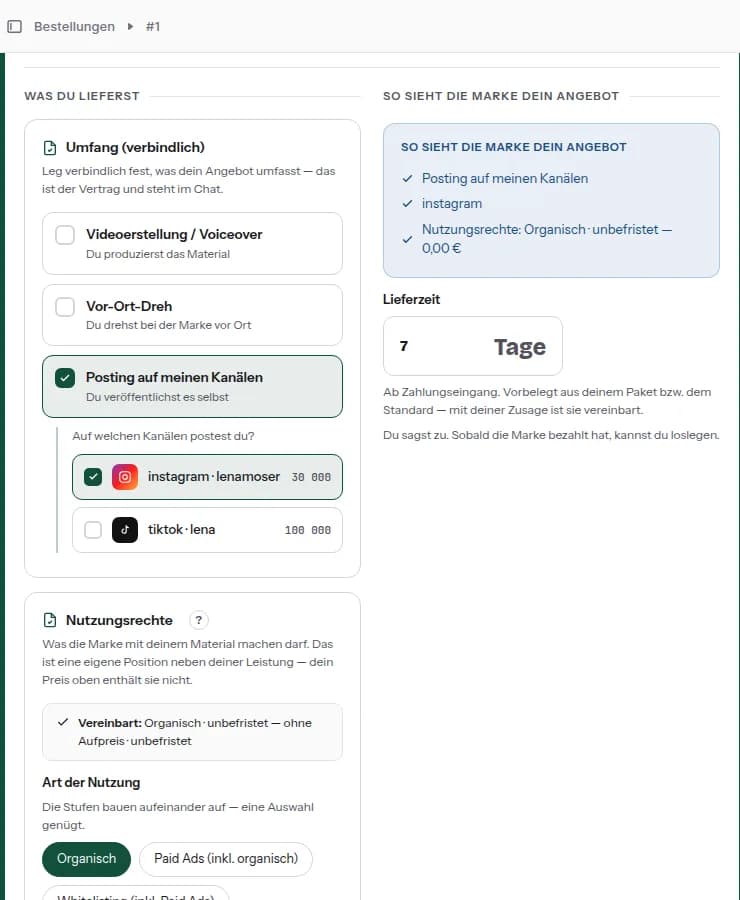
Bovenaan staat wat het merk wil; onderaan wat jij bindend toezegt. Wat je daar instelt, is het contract — het staat daarna in de chat en kan niet stilletjes worden gewijzigd.
Stap 7.1
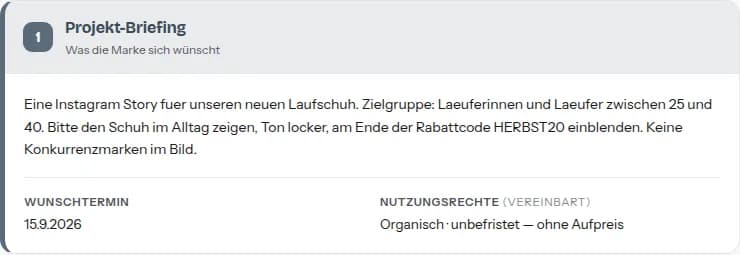
De briefing
Wat er moet ontstaan, de gewenste datum en de gebruiksrechten die het merk heeft aangevraagd. Ontbreekt er iets, vraag het dan in de chat voordat je toezegt.
Stap 7.2
De omvang
Videoproductie, opnames op locatie, posten op je kanalen, dienst — en bij posten de kanalen erbij. Rechts kijk je mee hoe het merk je aanbod zal lezen.
8. Toezeggen of een offerte uitbrengen
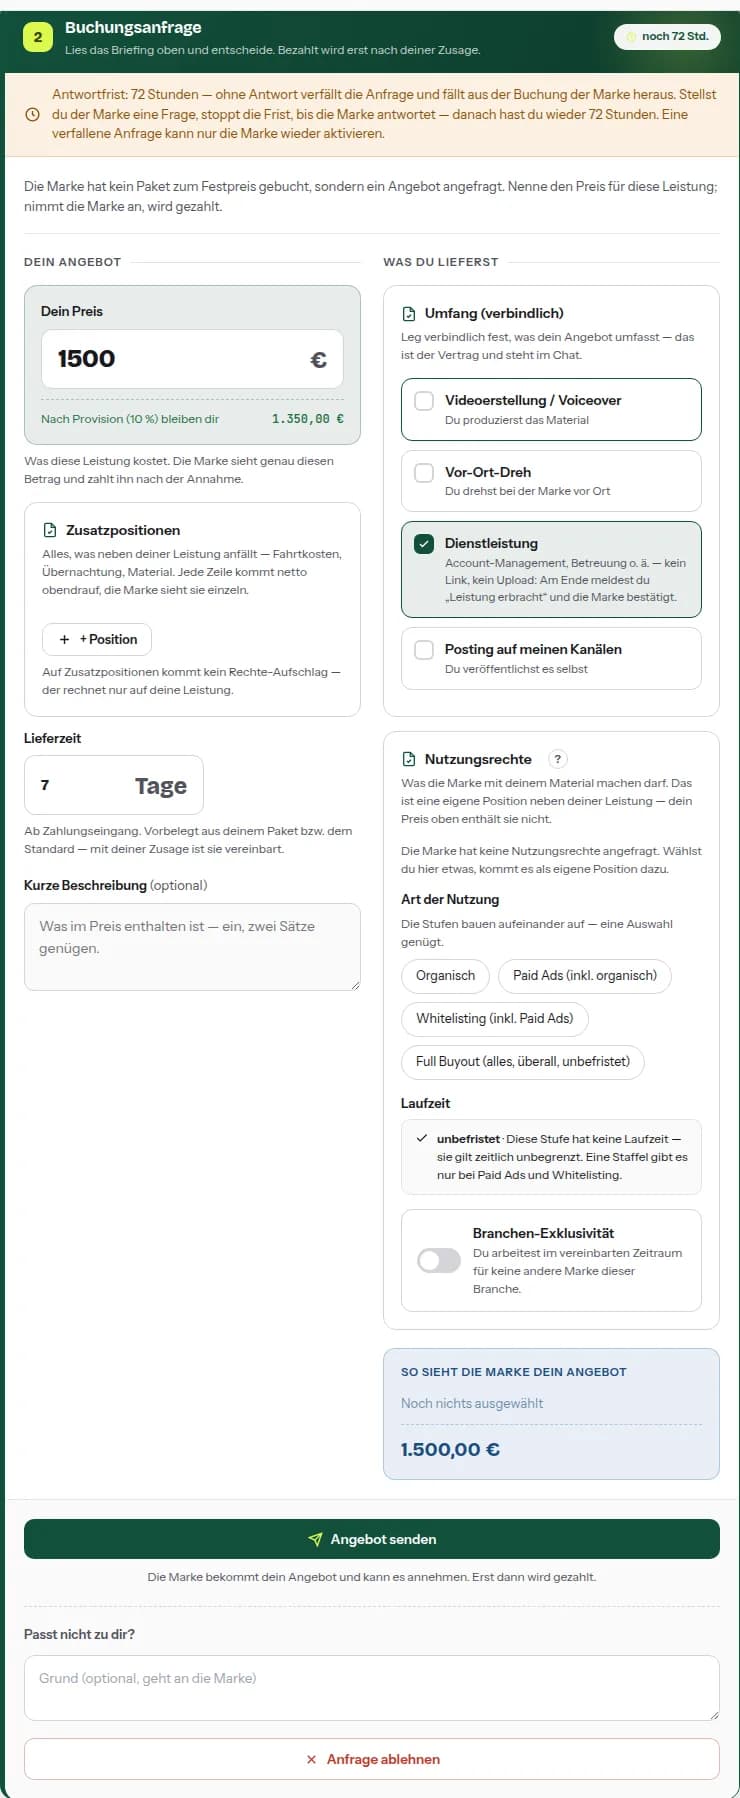
Bij een pakket ligt de prijs vast, je zegt alleen toe. Bij een offerteaanvraag noem je hem zelf. Voor het antwoord loopt een termijn; zonder antwoord vervalt de aanvraag.
Stap 8.1
Offerte uitbrengen
Jouw prijs, daaronder meteen wat er na commissie voor jou overblijft. Extra posten, levertijd en een korte beschrijving kun je toevoegen. Past het niet bij je, wijs dan af met reden — dat is beter dan een verlopen termijn.
Stap 8.2
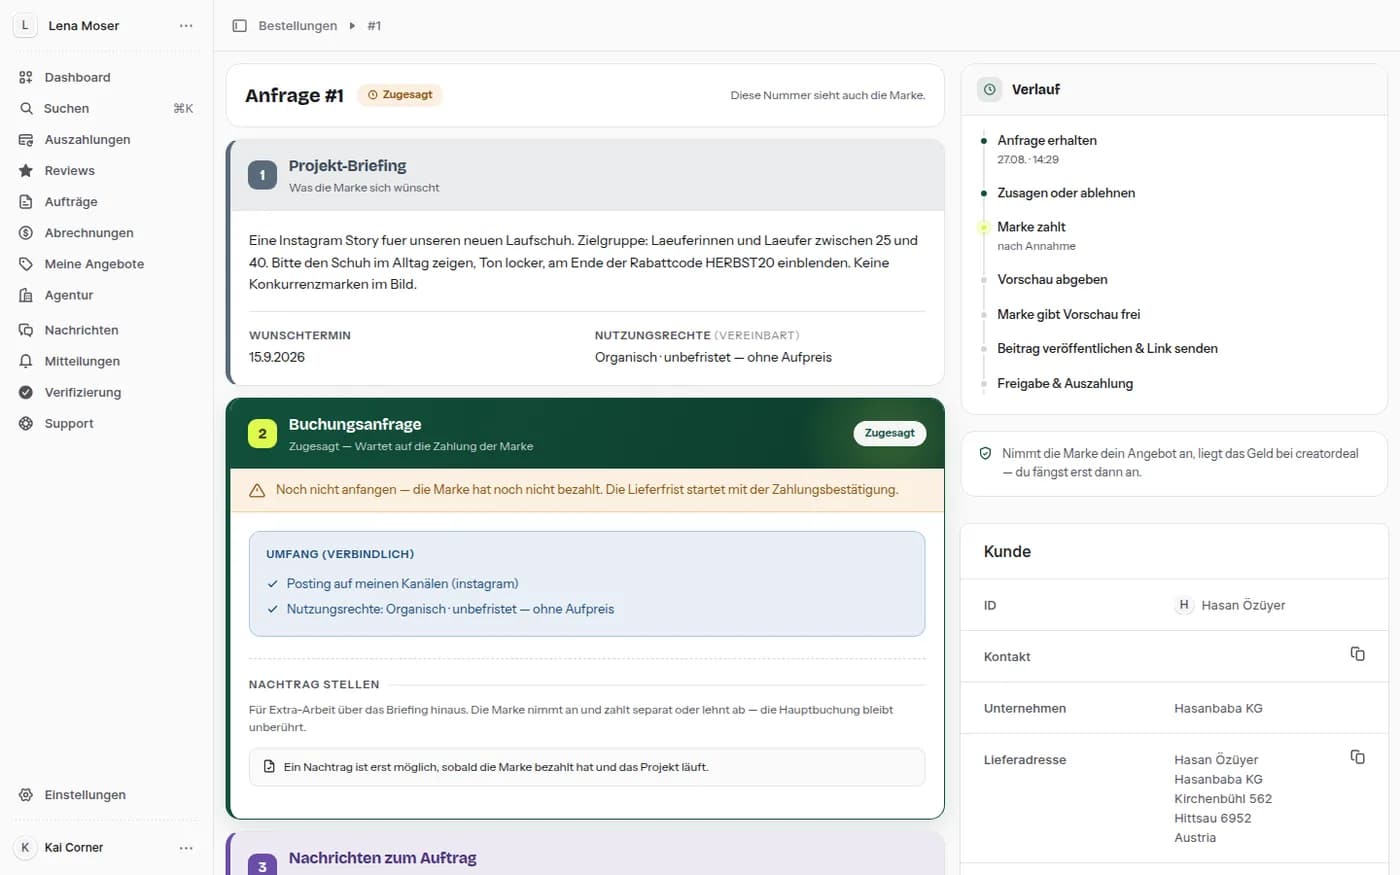
Toegezegd — en nu?
Na de toezegging staat de opdracht op 'Wacht op de betaling van het merk'. Begin nog niet: de levertermijn start met de betalingsbevestiging. Rechts loopt het verloop mee, van aanvraag tot uitbetaling.
9. Tegenbod van het merk
Het merk mag tegenover jouw offerte een eigen prijs zetten. Dat gaat heen en weer tot iemand accepteert of afbreekt.
Stap 9.1
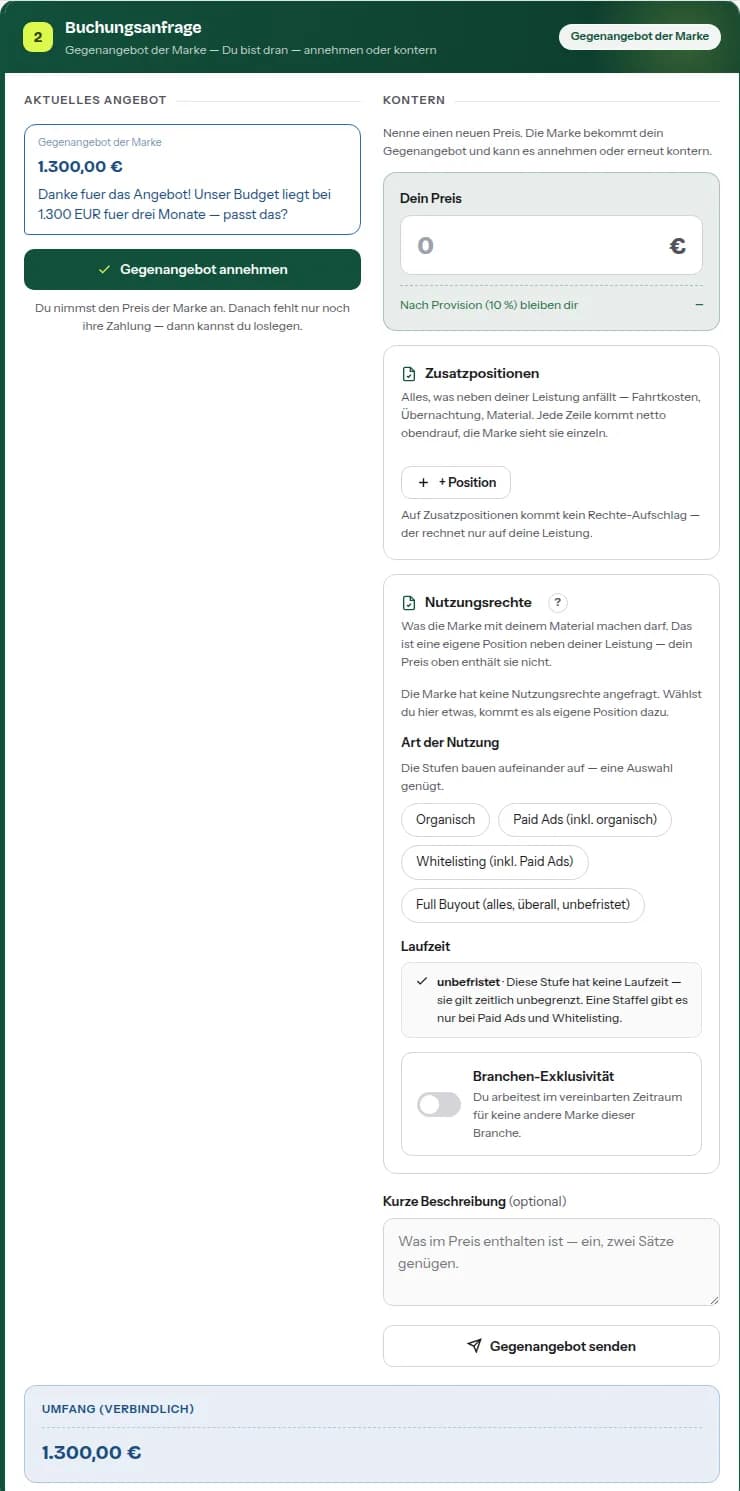
Accepteren of counteren
Links het tegenbod met bedrag en motivatie, rechts jouw reactie met nieuwe prijs, gebruiksrechten en een regel erbij. Zolang het merk aan zet is, pauzeert jouw antwoordtermijn.
10. Leveren: preview, dan post
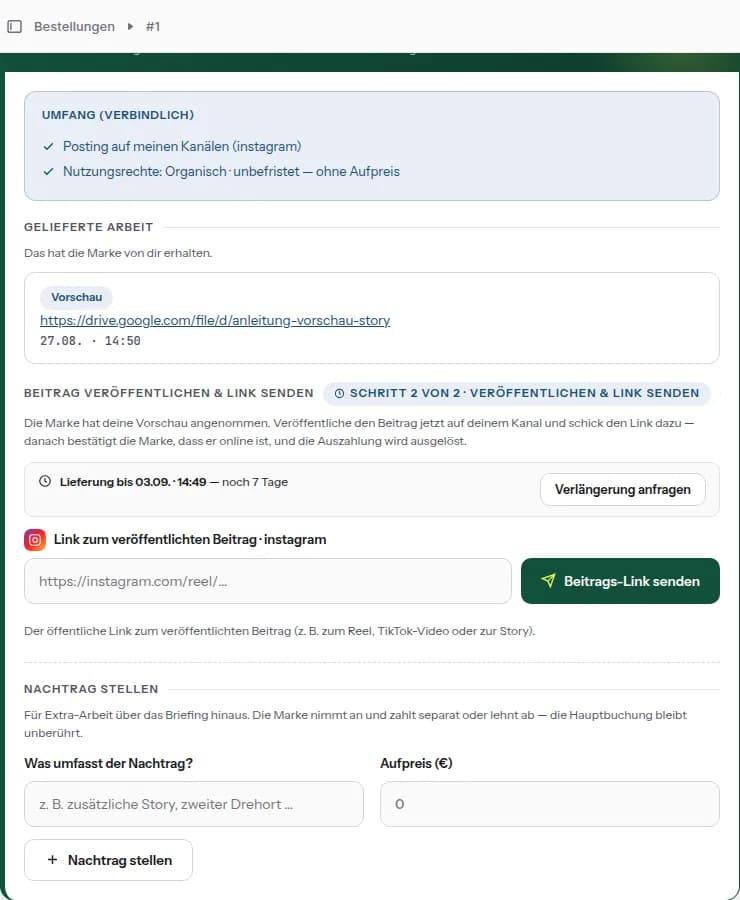
Een boeking die op jouw kanaal verschijnt, wordt in twee rondes geleverd: eerst de preview ter goedkeuring, dan de link naar de gepubliceerde post.
Stap 10.1
Preview indienen
Vul de link naar de preview in — Drive, Dropbox, WeTransfer of waar je hem bewaart. Geen link uit dit panel: die kan niemand behalve jij openen. Er is daarmee nog niets gepubliceerd; het merk controleert eerst.
Stap 10.2
Post-link versturen
Zodra het merk de preview heeft geaccepteerd, publiceer je en stuur je de openbare link mee. Daarna bevestigt het dat hij online staat — dat activeert de uitbetaling. Post je op meerdere kanalen, vul de links dan na elkaar in.
11. Diensten: prestatie geleverd melden
Bij een omvang zonder link en zonder bestand — advies, shoot, een afspraak op locatie — valt er niets te uploaden.
Stap 11.1
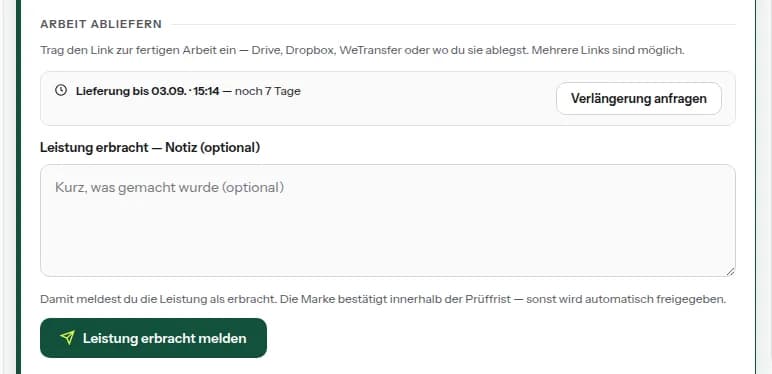
Melden in plaats van uploaden
Een korte notitie is vrijwillig; de knop heet 'Prestatie geleverd melden'. Daarna heeft het merk een controletermijn — zonder bezwaar wordt automatisch vrijgegeven.
12. Meerwerk indienen
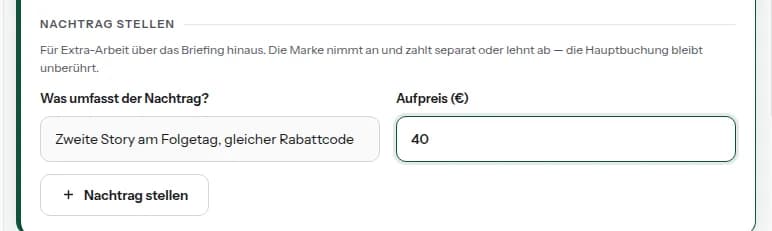
Voor extra werk buiten de briefing. Het meerwerk hangt aan dezelfde boeking, maar wordt apart beslist en apart betaald.
Stap 12.1
Extra werk afrekenen
Beschrijf wat erbij komt en noem de meerprijs. Het merk accepteert en betaalt apart, of wijst af; de hoofdboeking blijft onaangetast. Dit kan zolang het project loopt — vóór de betaling en na de afronding niet.
13. Uitschrijvingen
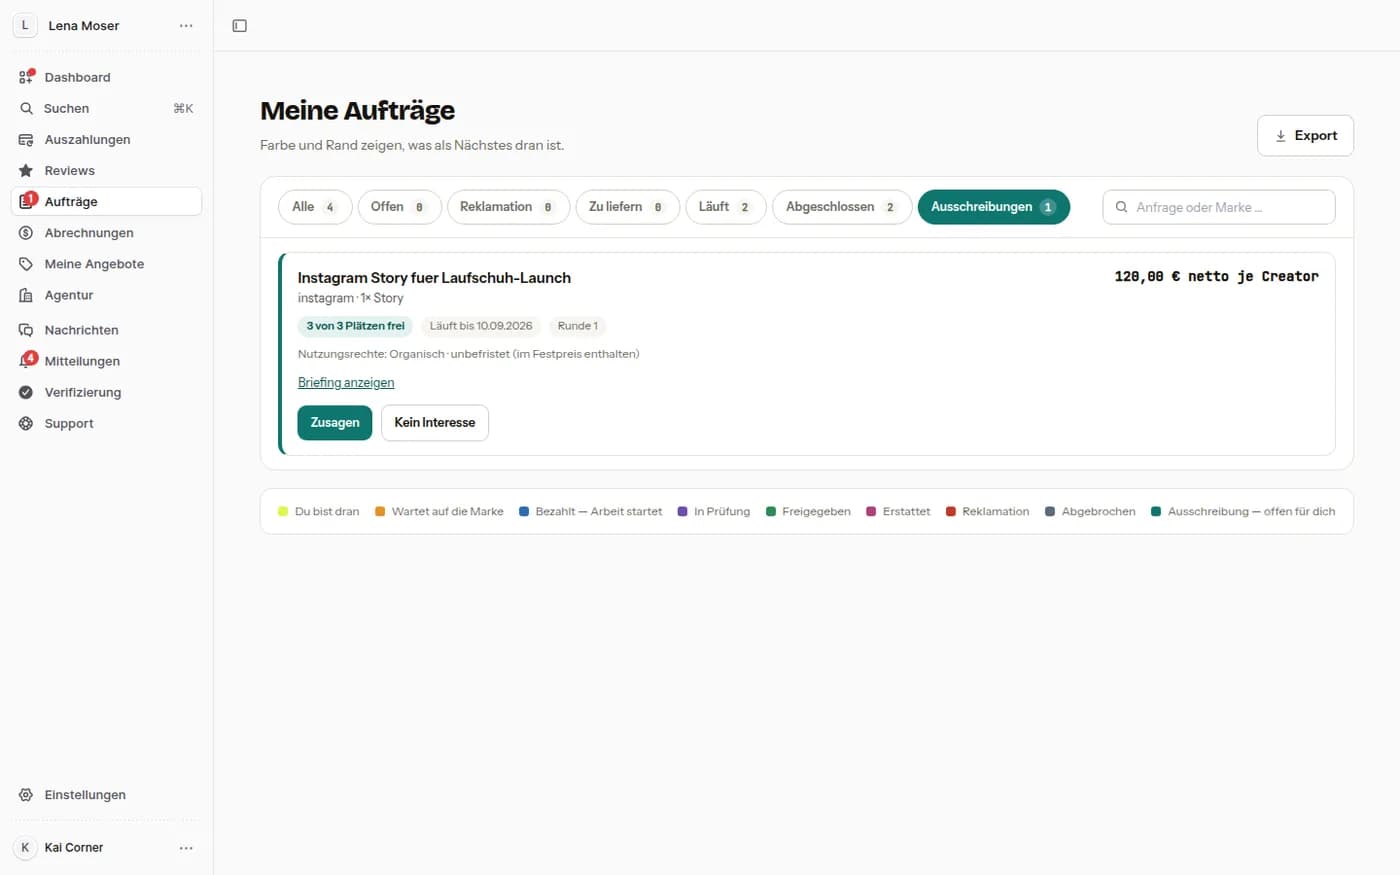
Merken schrijven uit in plaats van één voor één aan te vragen. Je ziet alleen de uitschrijvingen waarvan jij in de doelgroep past.
Stap 13.1
Toezeggen of overslaan
In het tabblad 'Uitschrijvingen' staan platform, formaat, prijs per creator, vrije plaatsen, looptijd en de inbegrepen gebruiksrechten; 'Briefing tonen' klapt de tekst open. Bij een vaste prijs zeg je toe, bij 'Offertes verzamelen' geef je een prijs op. Betaald wordt gebundeld wanneer het merk de uitschrijving sluit.
14. Afrekeningen
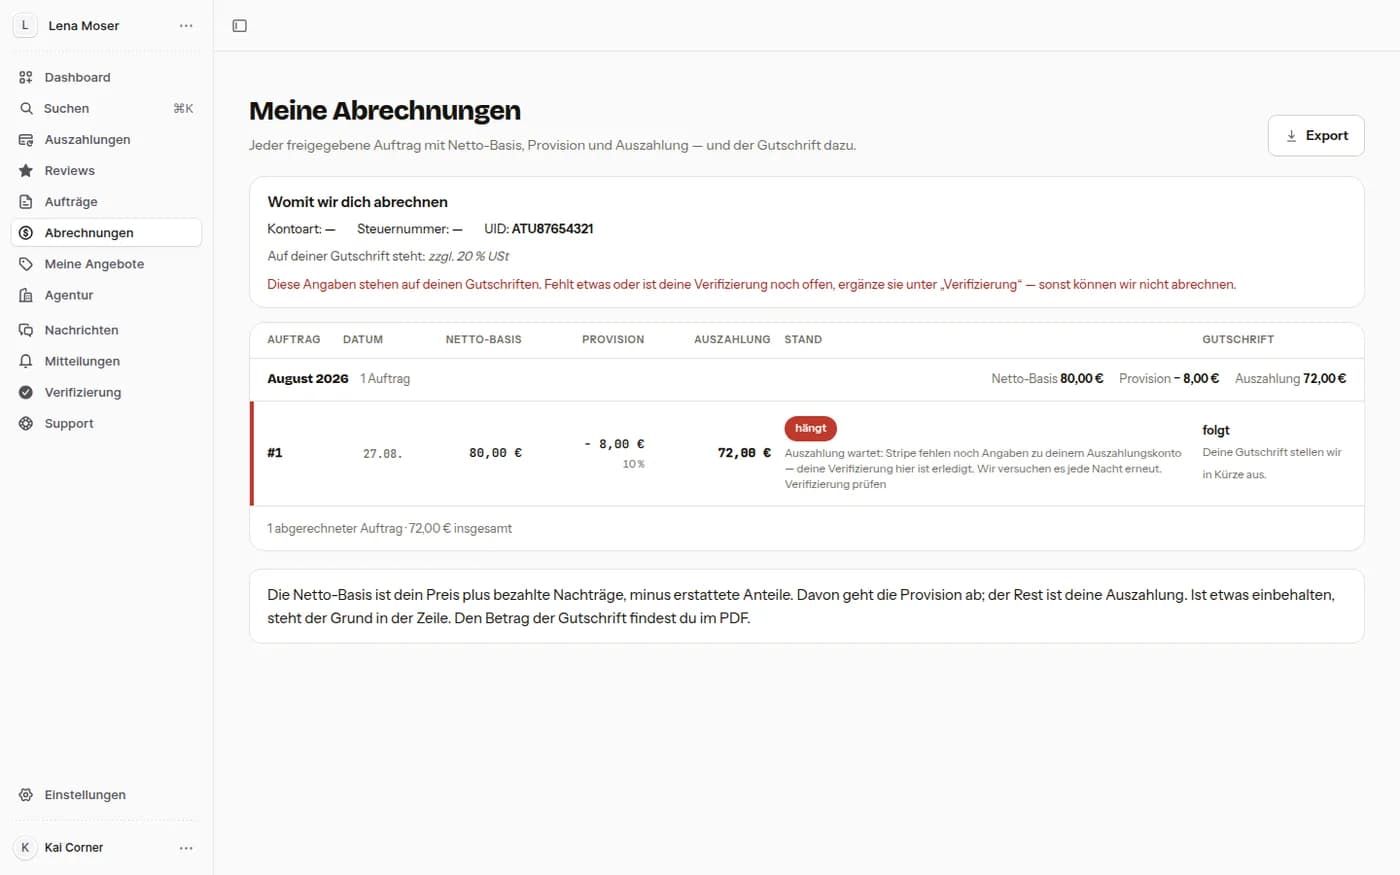
Wat er van een vrijgegeven opdracht wordt: nettobasis, commissie, jouw uitbetaling — en de creditnota erbij.
Stap 14.1
Wat er binnenkomt, en wanneer
Per opdracht één rij met datum, basis, commissie, uitbetaling en status. Bovenaan staat met welke gegevens we je afrekenen; ontbreekt er iets, dan zegt de melding waar je het aanvult. 'Export' haalt de lijst als bestand op.
15. Verificatie en uitbetaalrekening
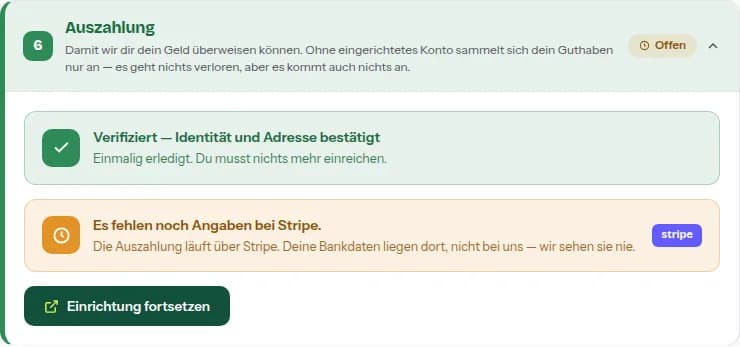
Twee dingen moeten één keer geregeld zijn voordat er geld stroomt: de verificatie bij ons en een uitbetalingsmethode — Stripe, bankrekening of PayPal. Ontbreekt een van beide, dan hoopt je tegoed zich alleen op.
Stap 15.1
Verificatie
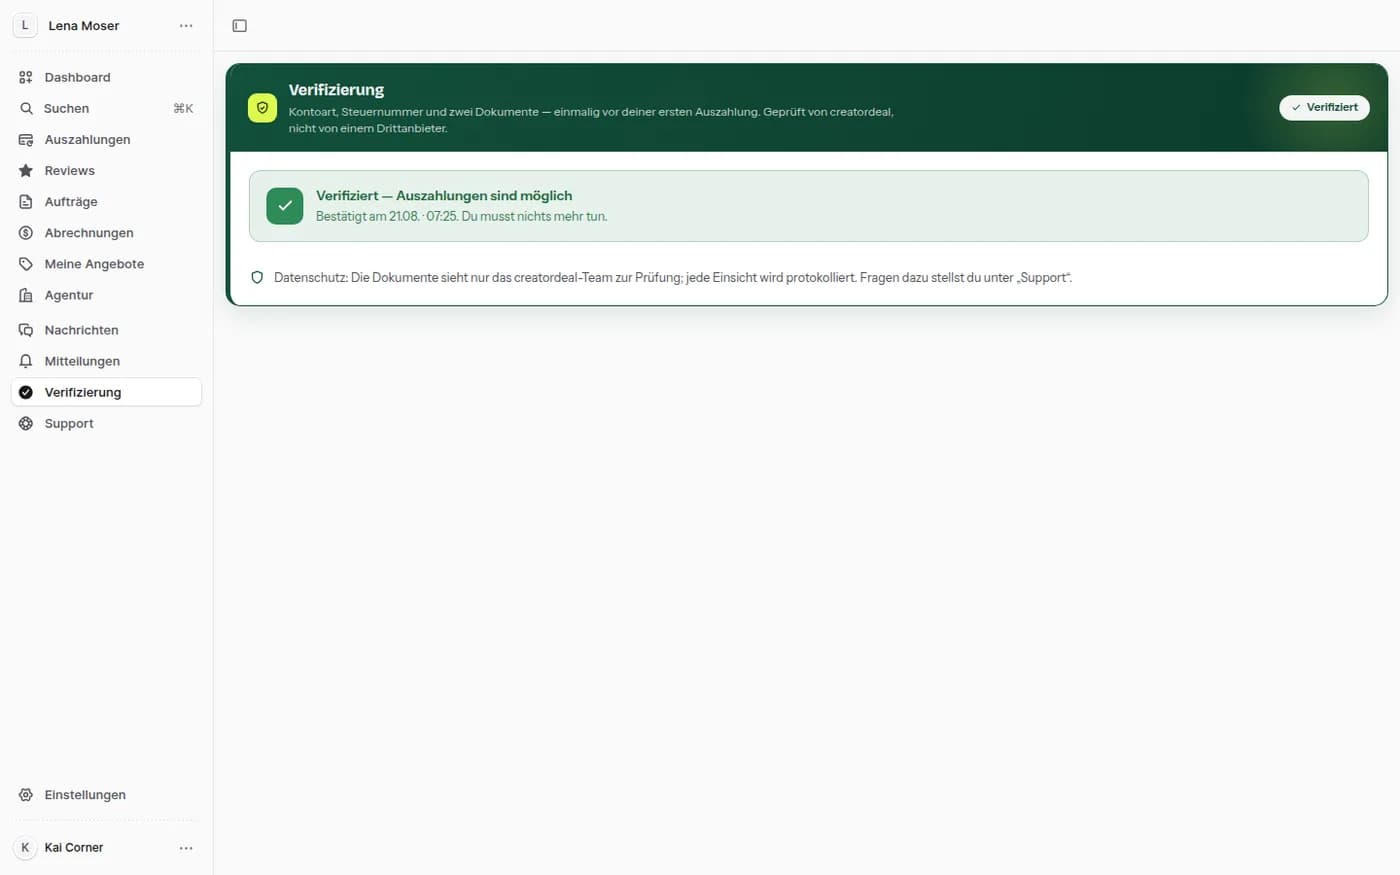
Accounttype, fiscale gegevens en de bijbehorende documenten — gecontroleerd door creatordeal, niet door een derde partij. De documenten ziet alleen het controleteam, elke inzage wordt geregistreerd. Eén keer bevestigd, nooit meer.
Stap 15.2
Uitbetaalrekening
Je kiest hoe je uitbetaald wordt: via Stripe (je bankgegevens staan dan bij Stripe), per bankoverschrijving of naar PayPal. Er wordt altijd in euro uitbetaald. Na een wijziging van je uitbetalingsgegevens geldt voor je eigen bescherming een blokkade van 72 uur. Ontbreekt er nog iets, dan staat het in de kaart 'Uitbetaling'.
16. Afwezigheid
Wie op vakantie is, mag geen termijn missen.
Stap 16.1
Vakantie invoeren
Vul de periode in waarin je niet werkt. Merken zien je dan als afwezig — dat is beter dan een aanvraag waarvan de antwoordtermijn verstrijkt terwijl je weg bent.
