دليل العلامات
كعلامة تحجزون هنا المبدعين — من أول نتيجة بحث حتى الاعتماد. هذا الدليل يقطع الطريق مرة واحدة: إنشاء حساب، إيجاد مبدعين، حجز، دفع، قبول. وبجانبه المسارات التي لا يحتاجها الجميع: عرض خاص، إعلان تعاون، إضافة، اعتراض. اللقطات من النظام الفعلي.
هذا الدليل بصيغة PDF1. إنشاء الحساب وتسجيل الدخول
التصفح ممكن بلا حساب. للطلب نحتاج الاسم والبريد ولاحقًا عنوان الفاتورة — لا أكثر.
الخطوة 1.1
إنشاء حساب
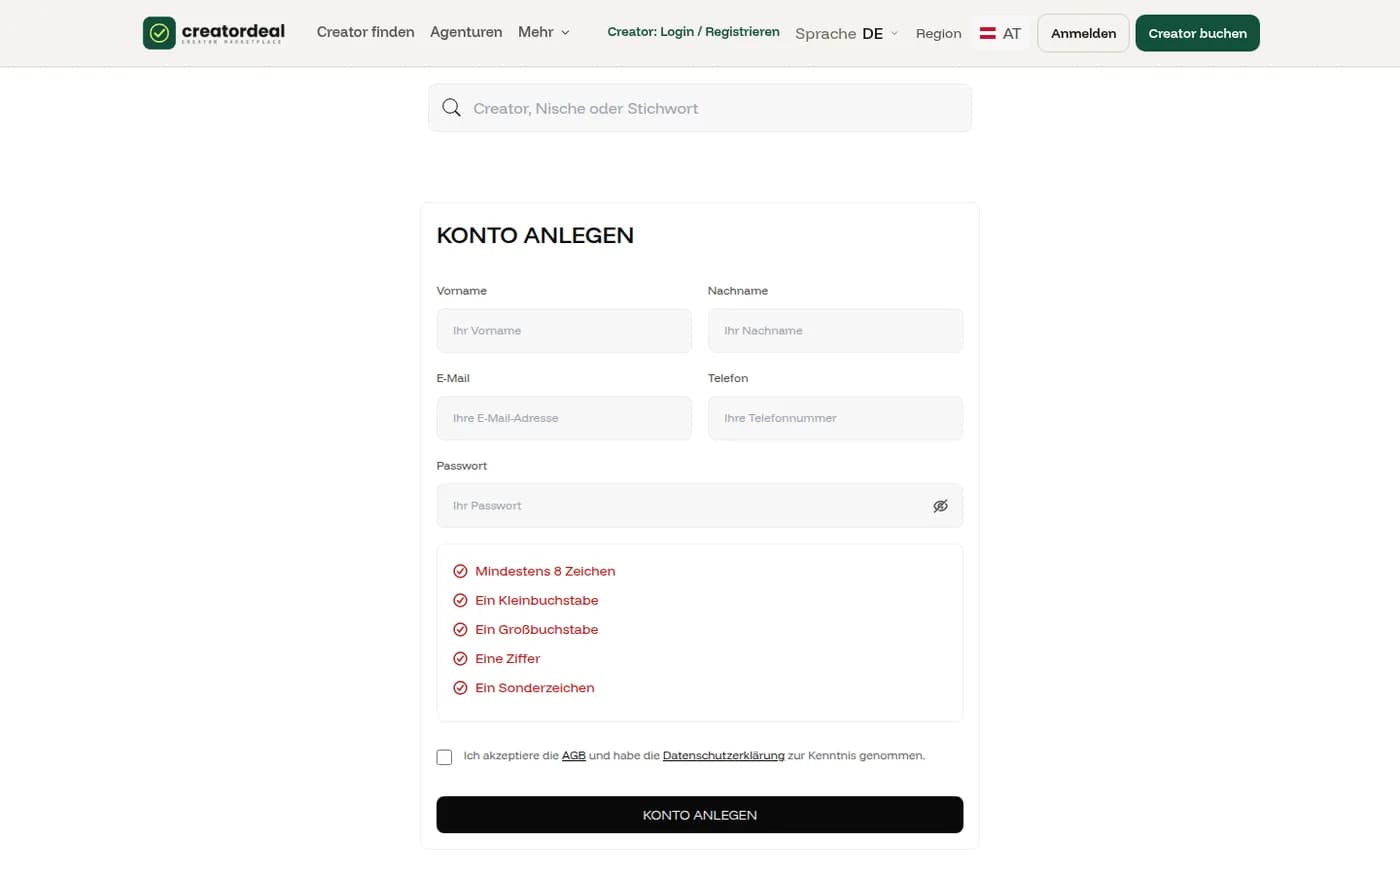
الاسم والبريد والهاتف وكلمة المرور. القواعد تحت حقل كلمة المرور تُعلَّم أثناء الكتابة. دون تحديد خانتي الشروط وسياسة الخصوصية لا يمكن المتابعة.
الخطوة 1.2
تسجيل الدخول
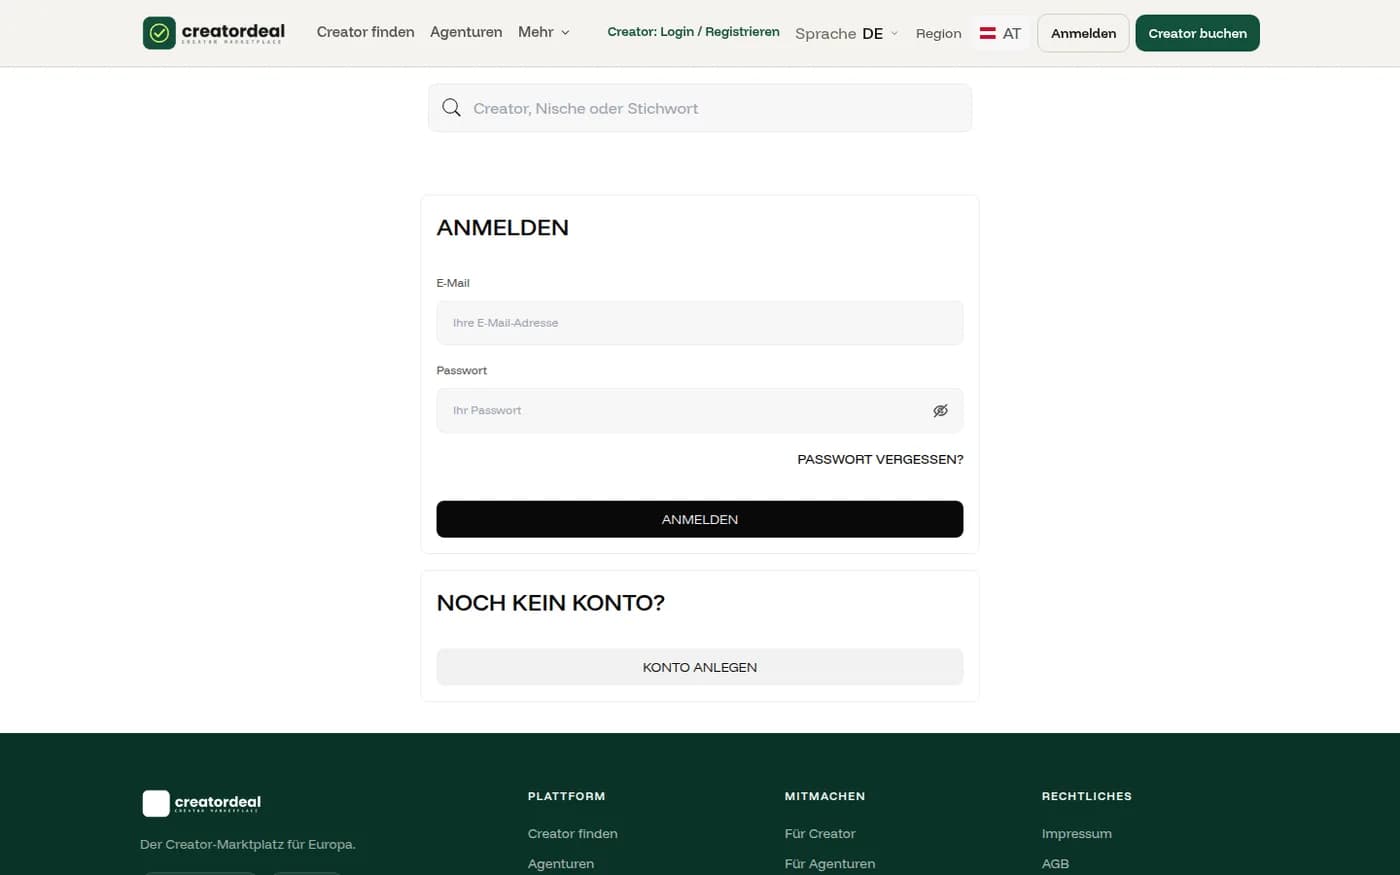
بعدها تسجلون الدخول بالبريد وكلمة المرور. إن ضاعت كلمة المرور فـ«نسيتم كلمة المرور؟» يرسل رابطًا إلى عنوانكم.
2. العثور على المبدعين
البحث في الصفحة الرئيسية ومرة أخرى فوق قائمة النتائج. يمكنكم البحث عن اسم بعينه — أو التصفح ثم التضييق.
الخطوة 2.1
بحث أو تصفح
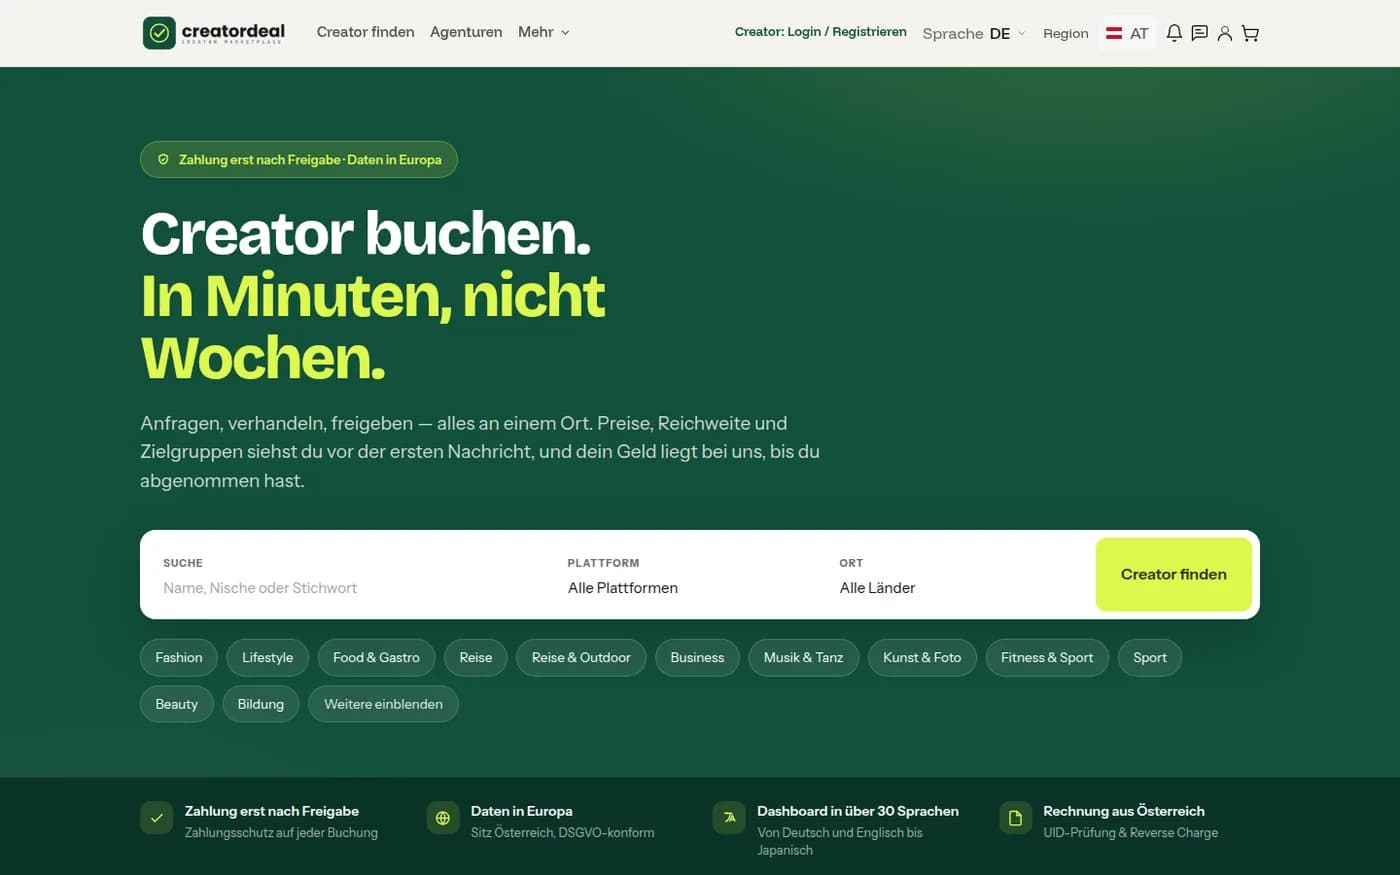
في الصفحة الرئيسية تدخلون كلمة مفتاحية ومنصة وبلدًا. من لا يبحث عن شيء محدد ينقر ببساطة إحدى الفئات أدناه.
الخطوة 2.2
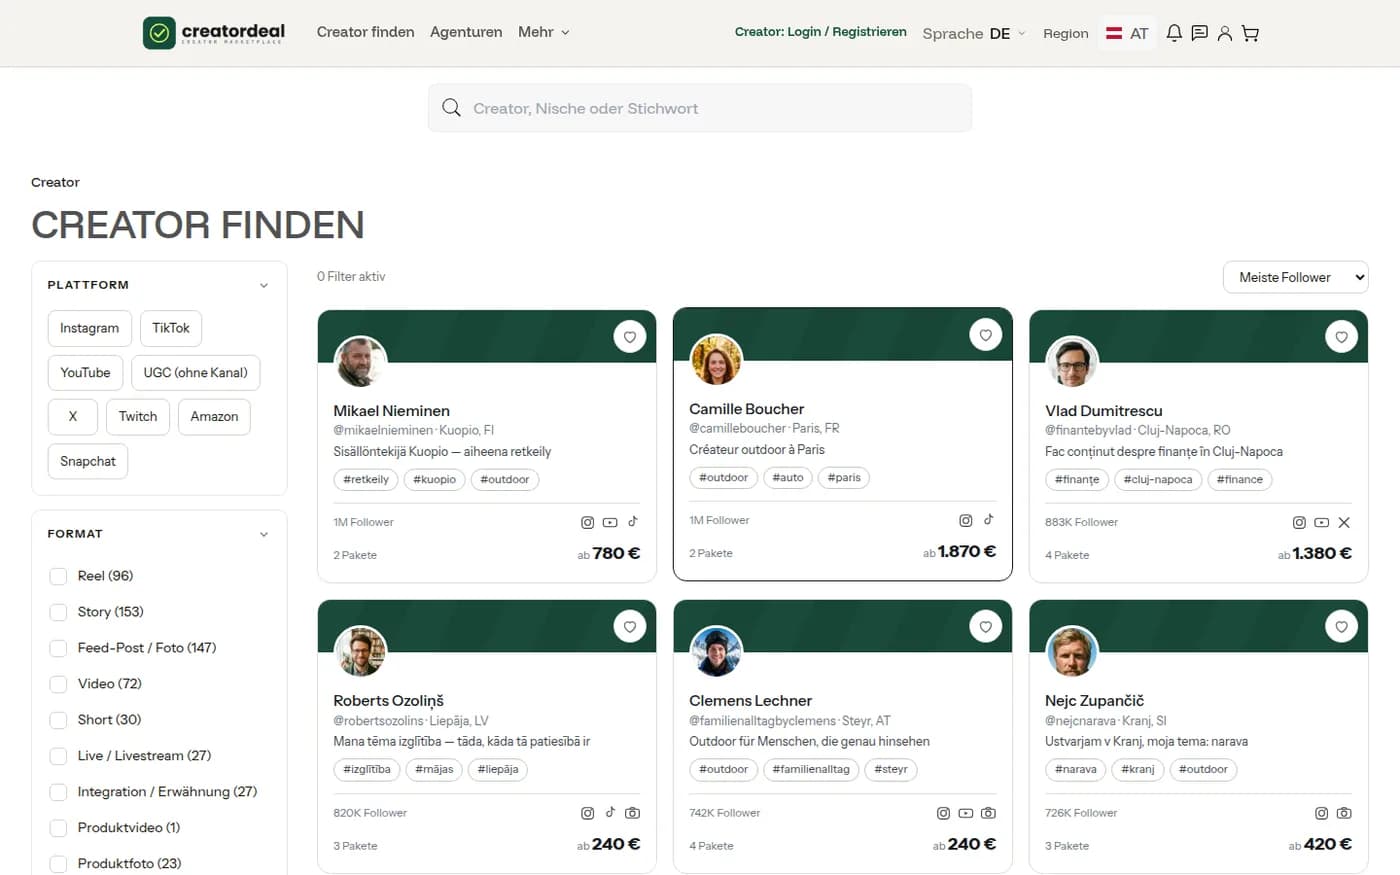
قائمة النتائج
كل بطاقة تعرض الوصول وعدد الباقات القابلة للحجز وأدنى سعر. القلب يضيف المبدع لقائمة الرغبات — لا يحدث أكثر.
الخطوة 2.3
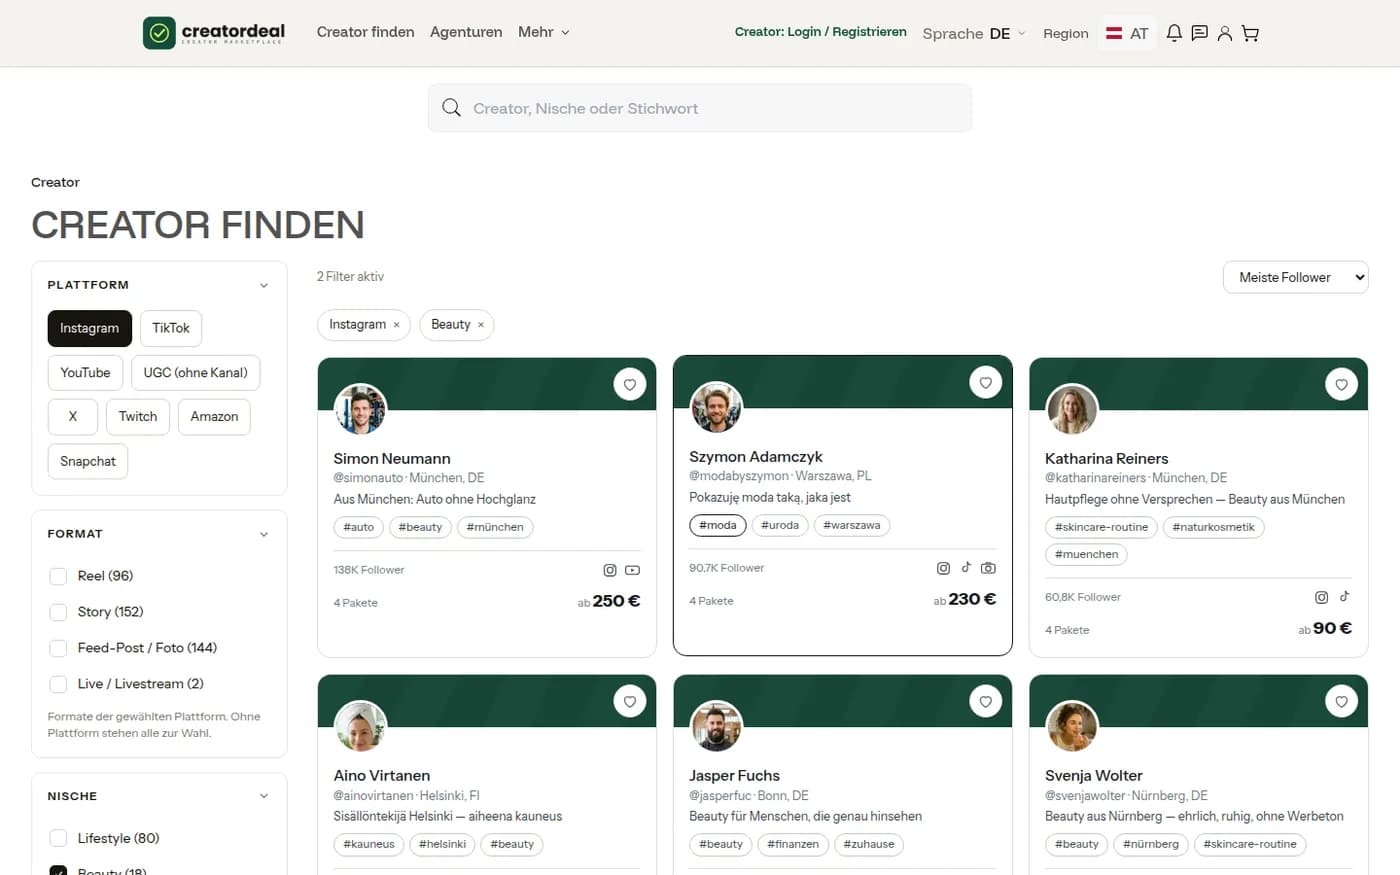
التضييق
على اليسار المنصة والصيغة والمجال والبلد والسعر؛ عند كل مدخل كم مبدعًا يطابق. فوق القائمة كم فلترًا نشطًا — وكل واحد يُزال على حدة.
الخطوة 2.4
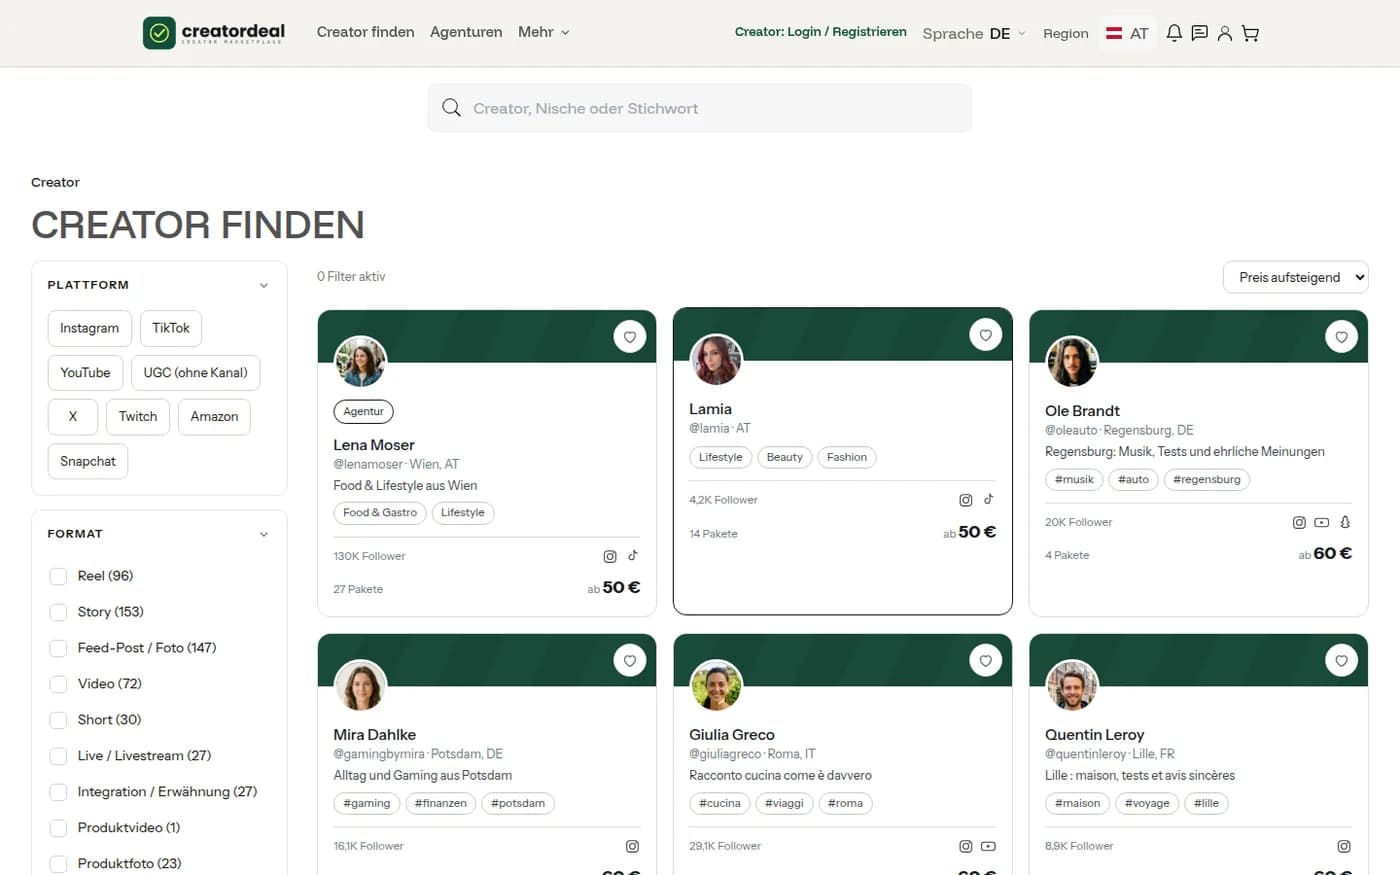
الترتيب
الترتيب تضبطونه يمين أعلى القائمة: الأكبر وصولًا أولًا أو الأرخص أولًا. هذا يغير الترتيب لا الاختيار.
3. الملف والباقات وصفحة البايو
في الملف كل ما يهم القرار: الوصول لكل قناة والمواضيع واللغات ووقت الرد — وأدناه ما يمكن حجزه.
الخطوة 3.1
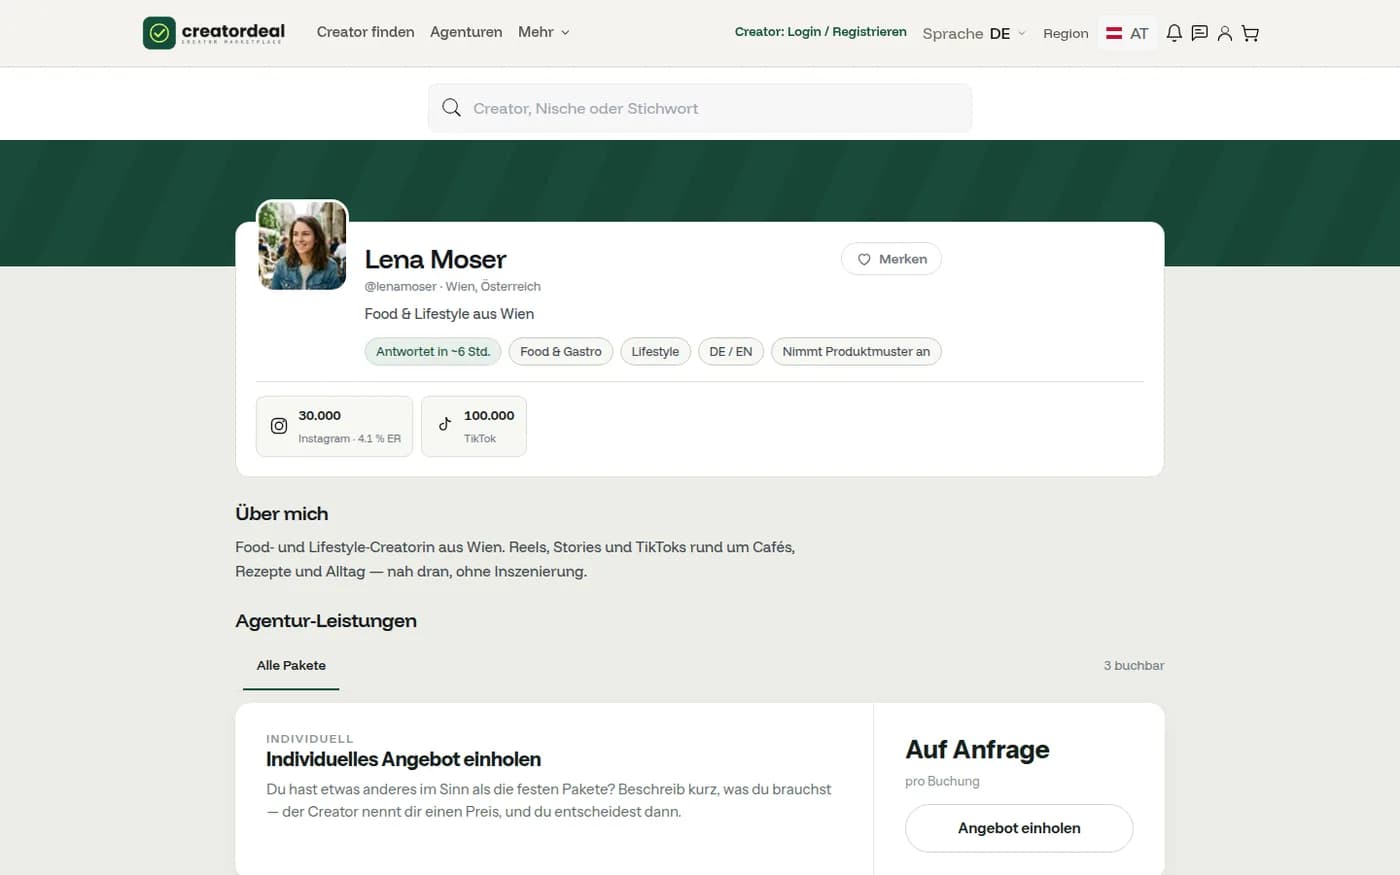
ملف المبدع
في الأعلى الوصول ومعدل التفاعل لكل قناة، وبيانات قصيرة كوقت الرد المعتاد أو قبول عينات المنتجات. أدناه «عني» والأعمال.
الخطوة 3.2
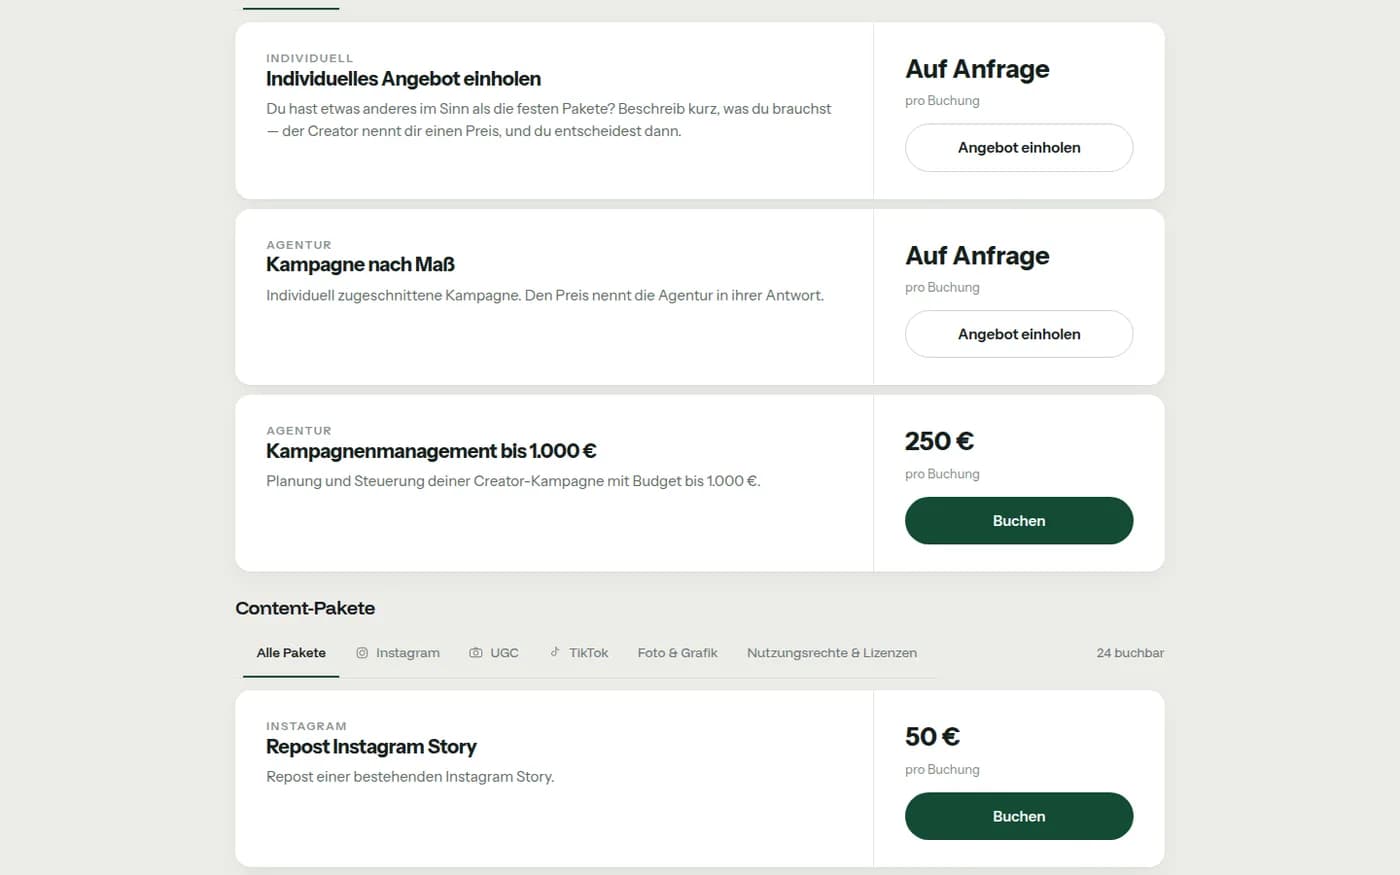
الباقات
الباقات مجمعة حسب القناة — Instagram وTikTok وUGC وصور وغرافيك وحقوق استخدام. لكل منها سعر ثابت. في الأعلى دائمًا «طلب عرض خاص» — إن لم يناسب شيء.
الخطوة 3.3
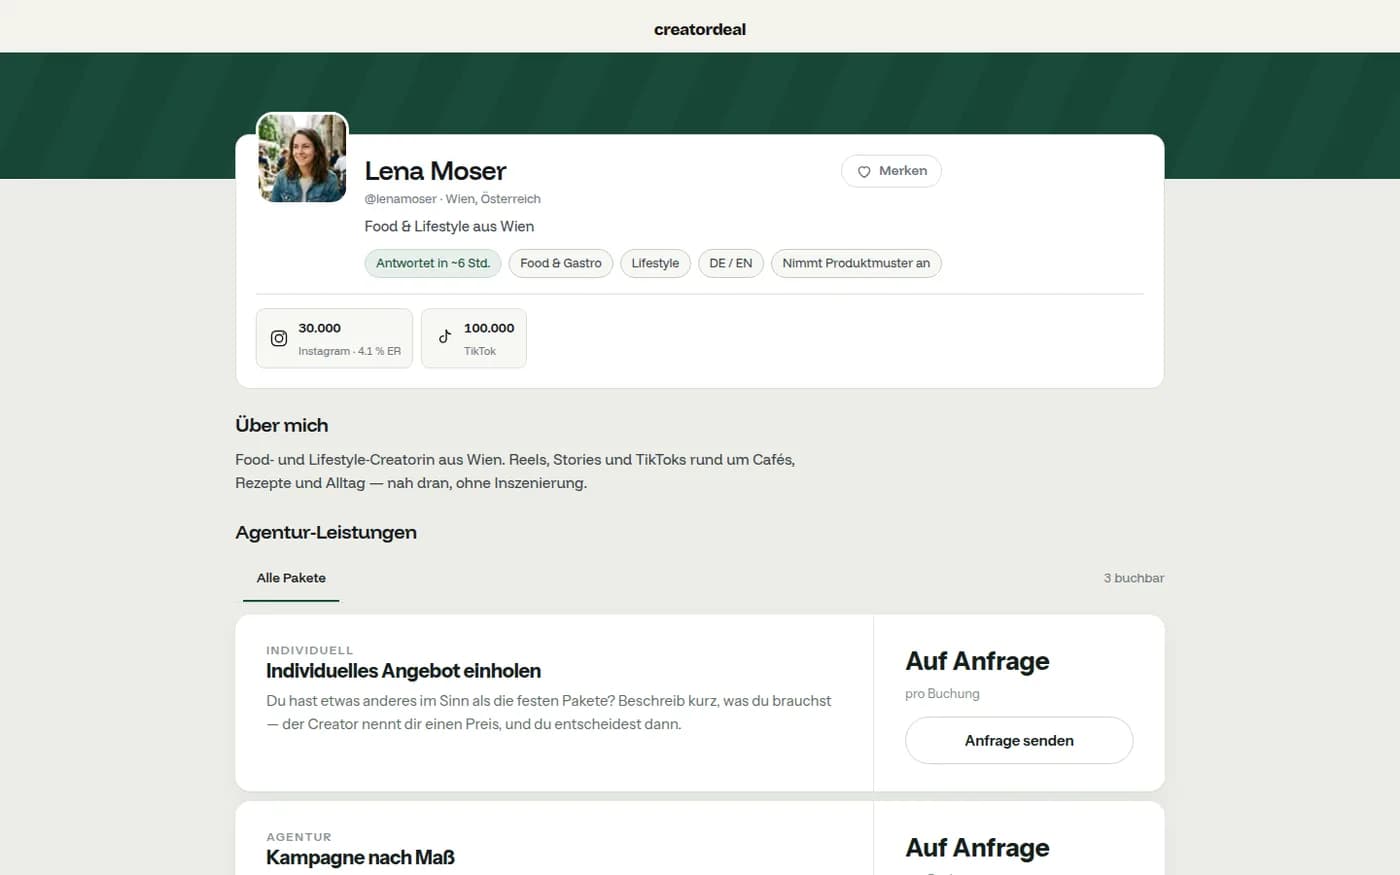
صفحة البايو
المبدع نفسه موجود أيضًا كصفحة خفيفة بلا ترويسة متجر؛ ذلك الرابط يضعه في ملفاته الاجتماعية. من هناك يصل الطلب حتى بلا حساب — وتصلكم حينها وصلة دخول بالبريد.
4. حجز باقة
للباقة سعر ثابت. تضعونها في السلة وتكتبون المهمة وترسلون الطلب. لا دفع إلا بموافقة المبدع.
الخطوة 4.1
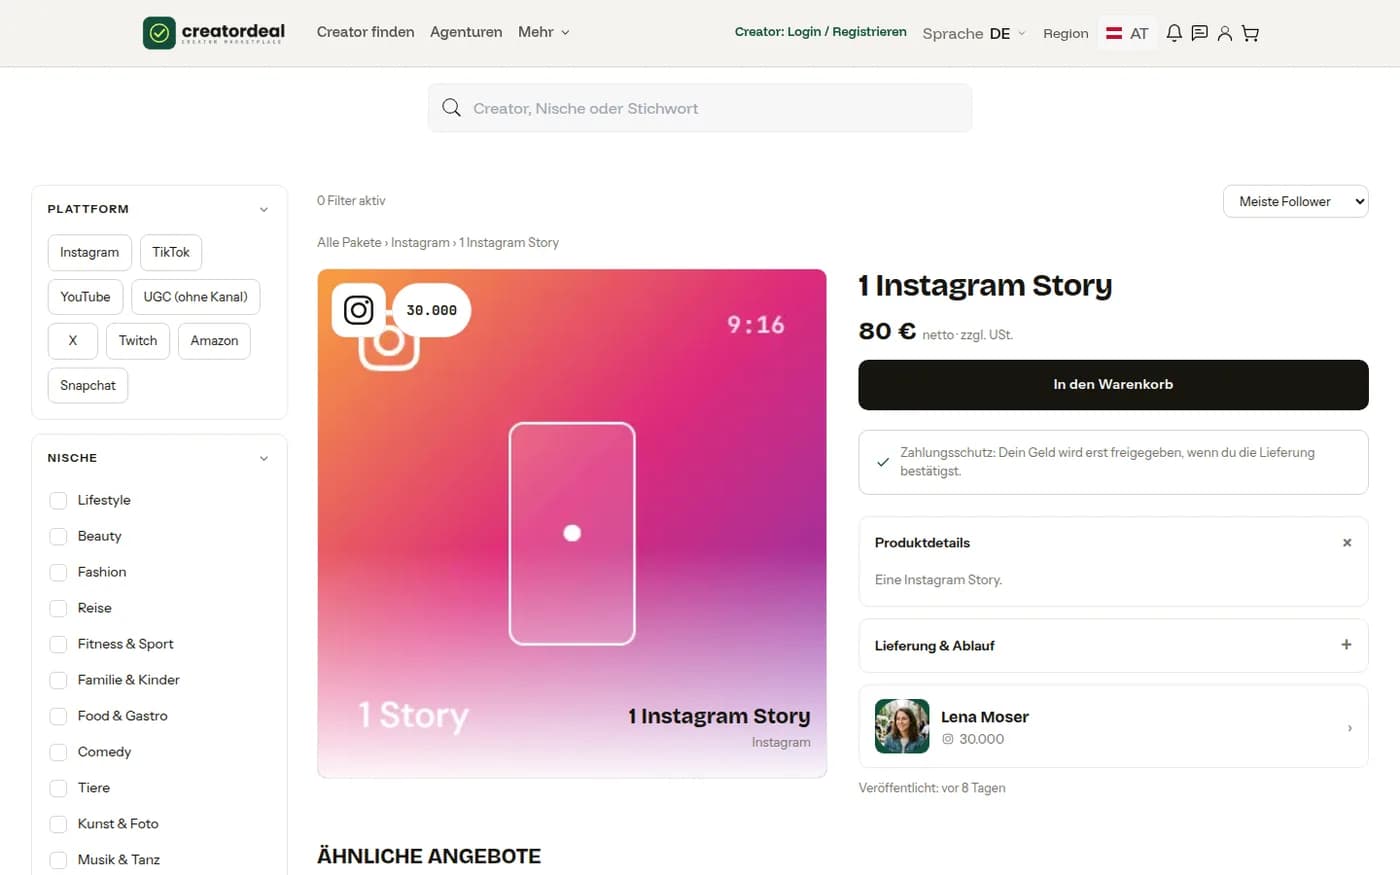
صفحة الباقة
ما المشمول، كم السعر صافيًا، كم يستغرق التسليم. «إلى السلة» يضعه جانبًا — لا يحدث شيء ملزم.
الخطوة 4.2
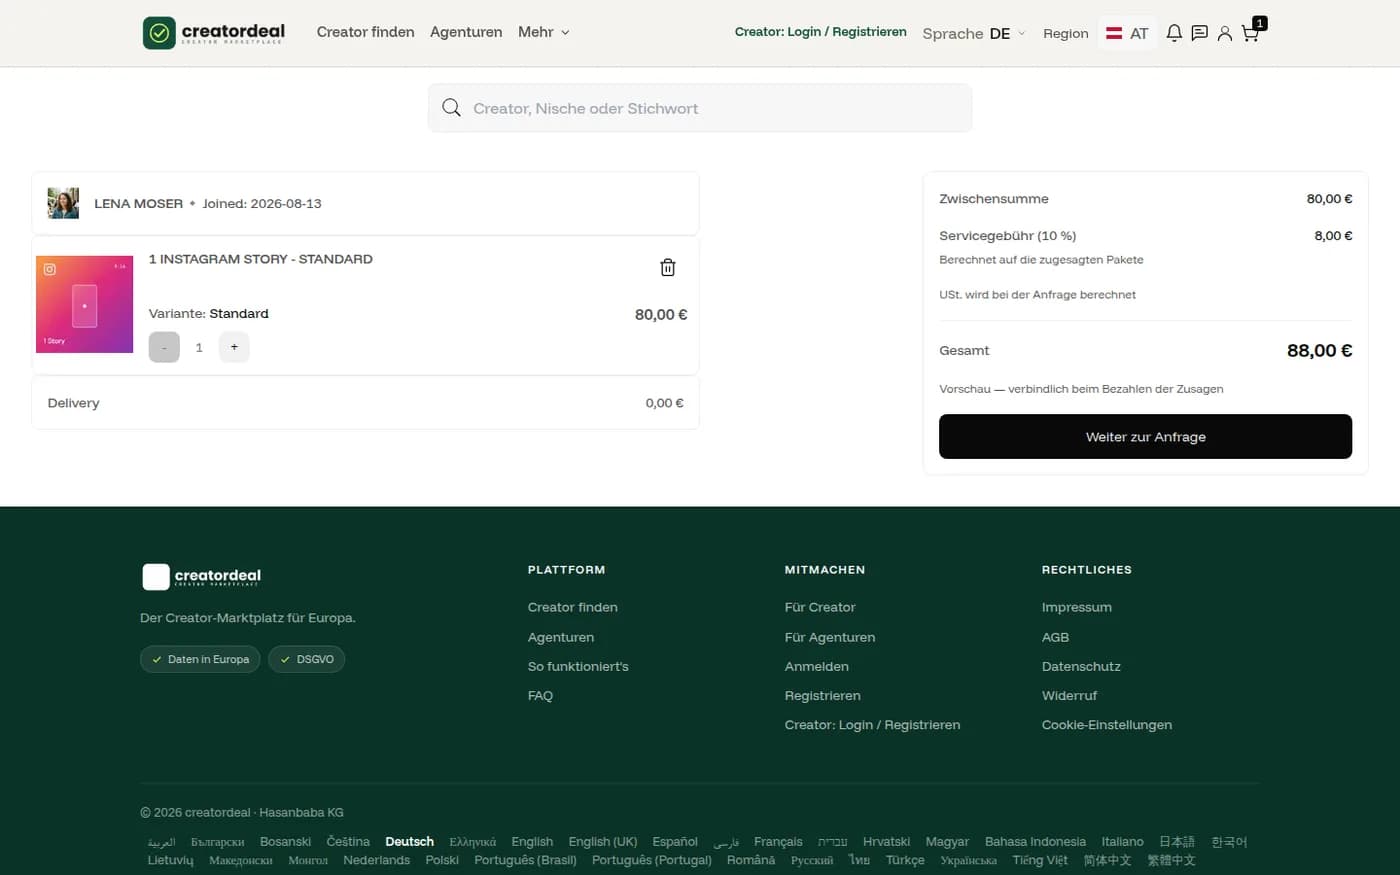
السلة
يمكن أن يجتمع عدة مبدعين في السلة؛ ومنهم ينشأ طلب واحد. في الأسفل المجموع الفرعي ورسم الخدمة كمعاينة. تضاف الضريبة فور معرفة عنوان الفاتورة.
الخطوة 4.3
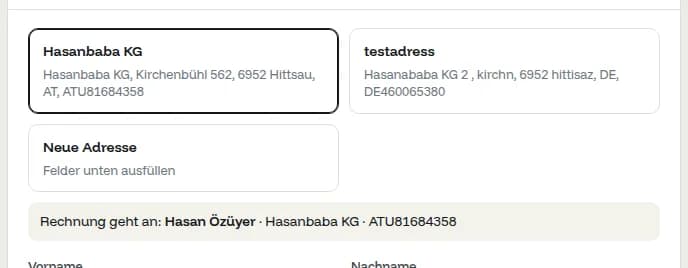
عنوان الفاتورة
اختاروا عنوانًا محفوظًا أو أنشئوا جديدًا. أعلاه يُذكر لمن تذهب الفاتورة — بالرقم الضريبي إن كان محفوظًا. عليه تُحسب الضريبة.
الخطوة 4.4
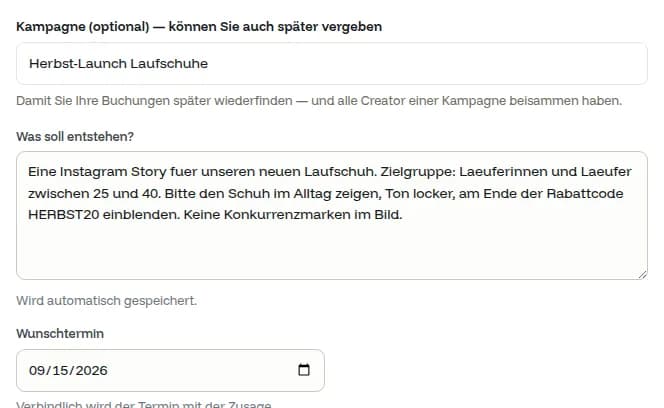
المهمة والموعد المرغوب
ما الذي يجب أن ينشأ، لمن، بأي رمز خصم. النص يُحفظ أثناء الكتابة ويدخل المحادثة كأول رسالة. الموعد المرغوب ممكن؛ ولا يلزم إلا بالموافقة.
الخطوة 4.5
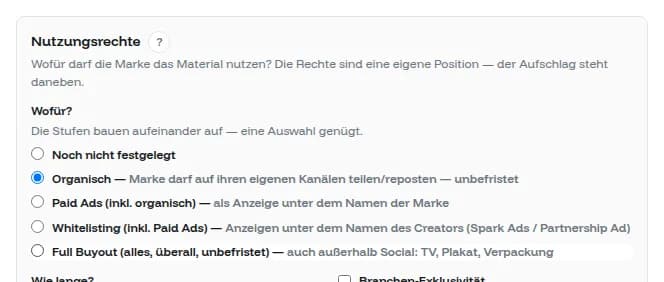
حقوق الاستخدام
فيمَ تستخدمون المادة — في قنواتكم فقط، كإعلان، كإعلان باسم المبدع، أم بلا حدود إطلاقًا؟ المستويات تبني على بعضها ويكفي اختيار واحد؛ والزيادة مذكورة بجانبه.
الخطوة 4.6
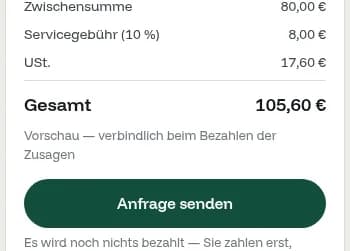
إرسال الطلب
في الأسفل تمامًا المبلغ كمعاينة. مع «إرسال الطلب» لا تدفعون شيئًا بعد — لا تدفعون إلا للبنود المقبولة.
5. الطلب جارٍ
الكرة الآن عند المبدع. في «حجوزاتي» ترون دائمًا من رد وما التالي.
الخطوة 5.1
هكذا يبدو الطلب
الرقم والمهمة وكل بند بحالته — وشريط من «أُنشئ» إلى «معتمد». ما دام لا أحد رد يمكنكم سحب الطلب.
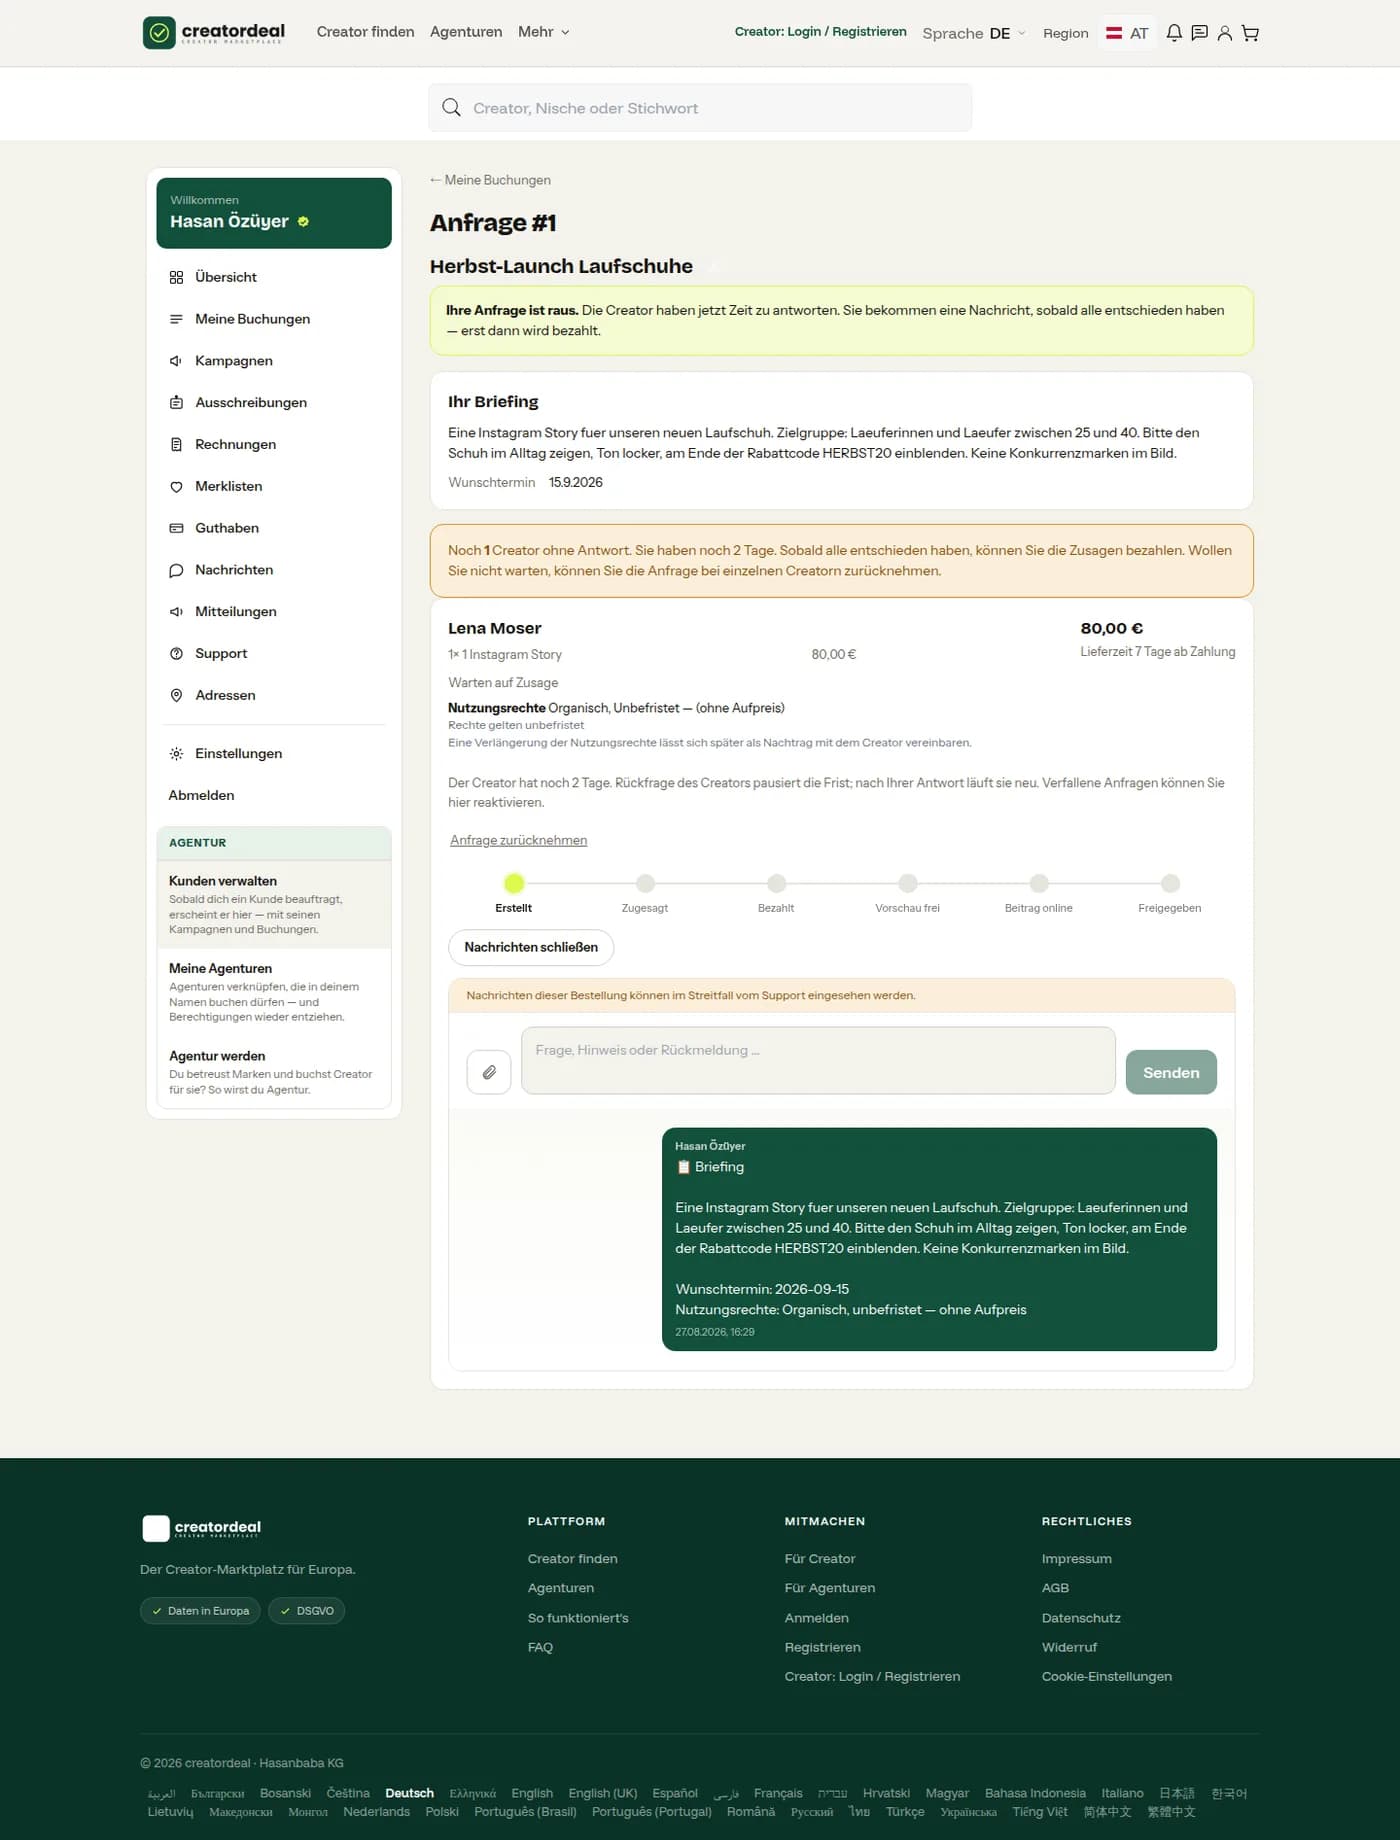
الخطوة 5.2
محادثة الحجز
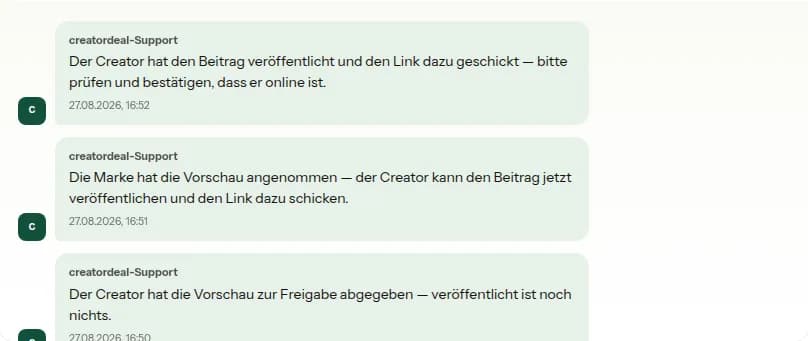
تحت الطلب تجري المحادثة مع المبدع. يكتب creatordeal فيها بنفسه عند كل خطوة: قُدمت المعاينة، قُبلت، المنشور على الإنترنت. في النزاع يمكن للدعم مراجعة رسائل هذا الحجز.
6. الدفع
يُدفع ما قُبل؛ والبنود المرفوضة تسقط من المبلغ. يبقى المال لدى creatordeal حتى اعتمادكم — والمهل في الأسئلة الشائعة.
الخطوة 6.1
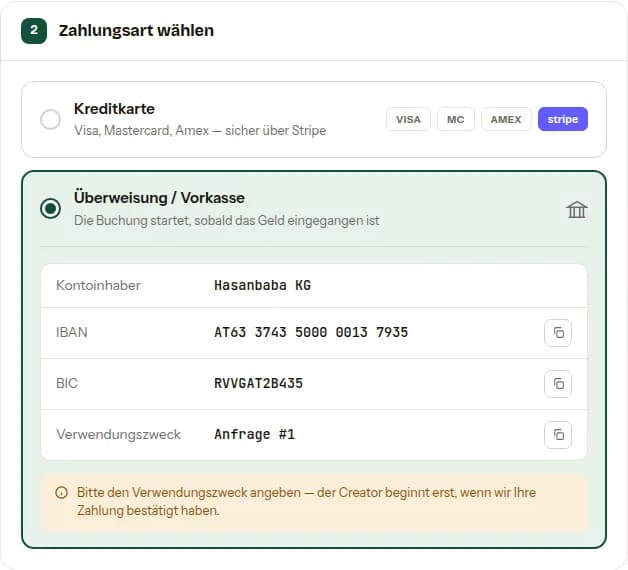
بطاقة ائتمان أو تحويل
بالبطاقة يبدأ الحجز فورًا. عند التحويل تُذكر بيانات صاحب الحساب وIBAN وBIC والغرض. يرجى ذكر الغرض — وإلا لن نجد الدفعة.
الخطوة 6.2
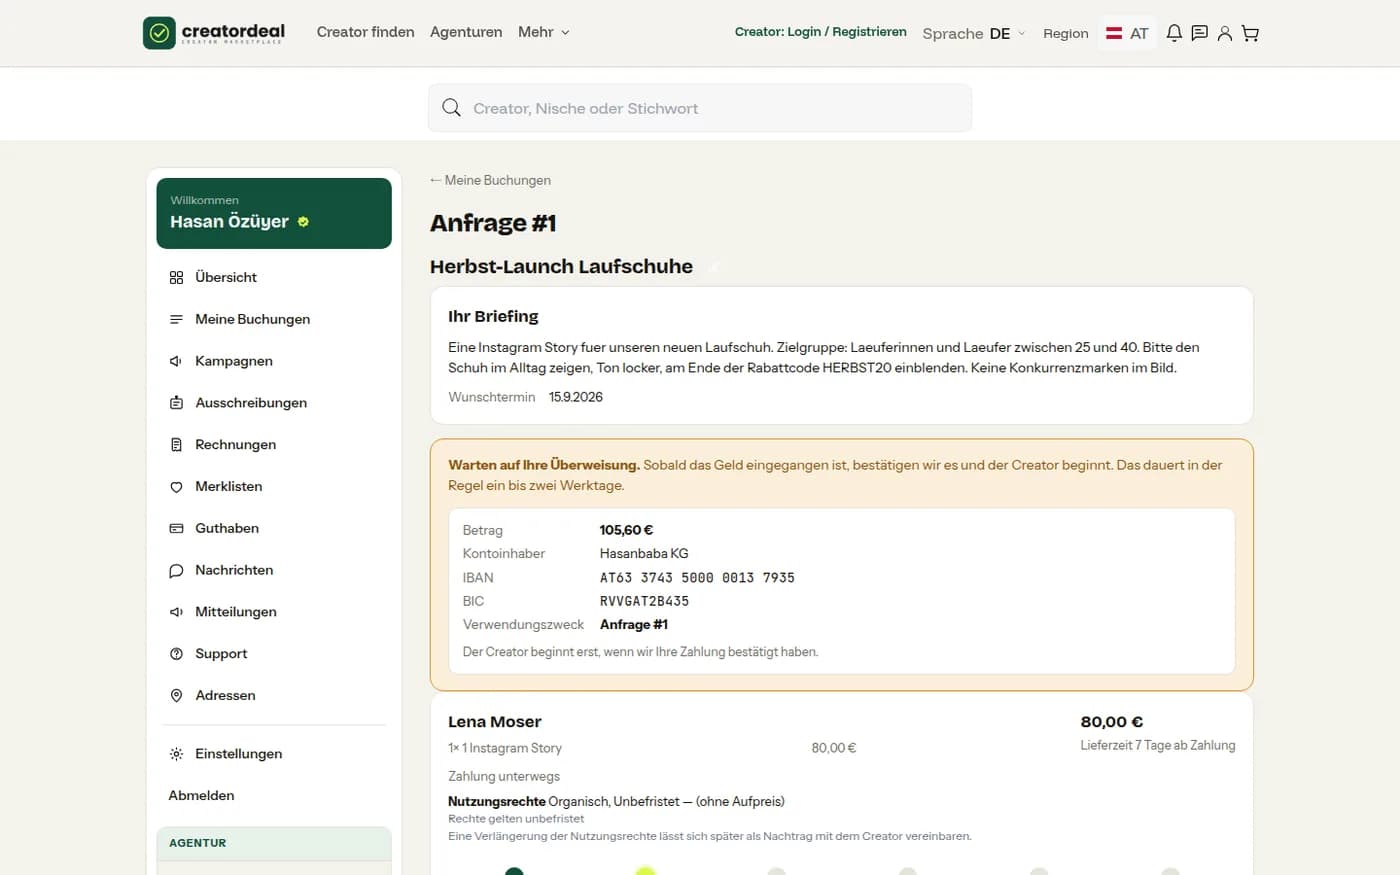
بعد التحويل
حتى الاستلام يكتب في الطلب «الدفع في الطريق»، وتحته بيانات البنك مرة أخرى. نؤكد الاستلام عادة خلال يوم أو يومي عمل؛ عندها فقط يبدأ المبدع.
7. اعتماد المعاينة وقبول المنشور
الحجوزات التي تظهر على قناة المبدع لها خطوتان: المعاينة أولًا ثم المنشور. لكل منهما مهلة مراجعة — بانقضائها تعد الخطوة معتمدة.
الخطوة 7.1
اعتماد المعاينة
المعاينة ليست عامة بعد. تعتمدونها أو تطلبون تعديلًا؛ وعلى الزر كم تعديلًا بقي. اعتماد المعاينة ليس قبولًا بعد ولا يطلق الدفعة.
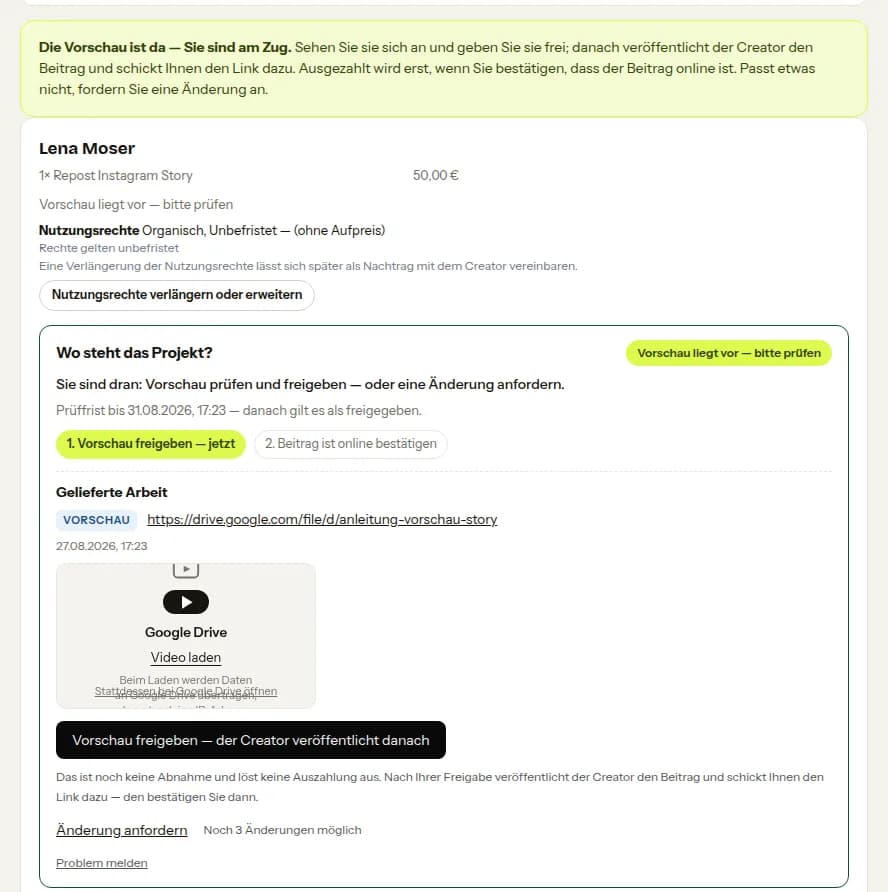
الخطوة 7.2
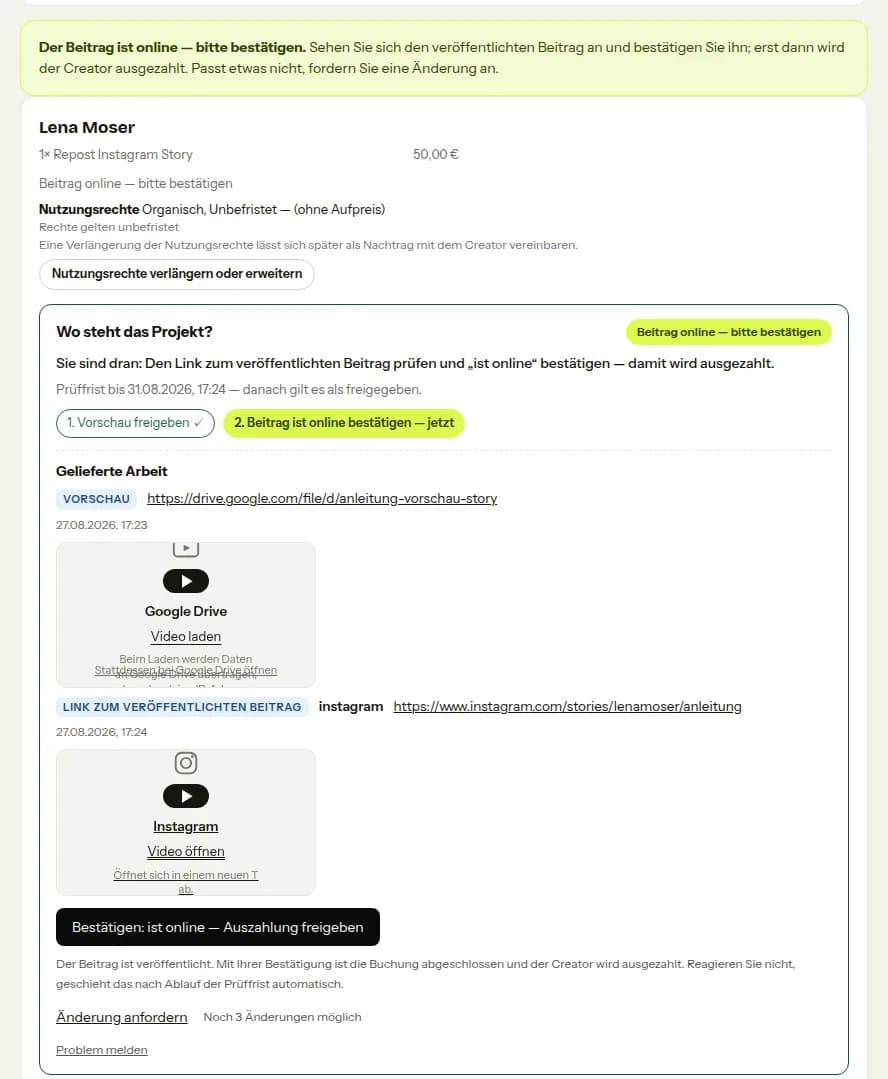
قبول المنشور
بعد النشر يرسل المبدع رابط المنشور. تفتحونه وتراجعون وتؤكدون «على الإنترنت» — فيُدفع للمبدع. إن نشر على عدة قنوات فلا اعتماد إلا باكتمالها كلها.
الخطوة 7.3
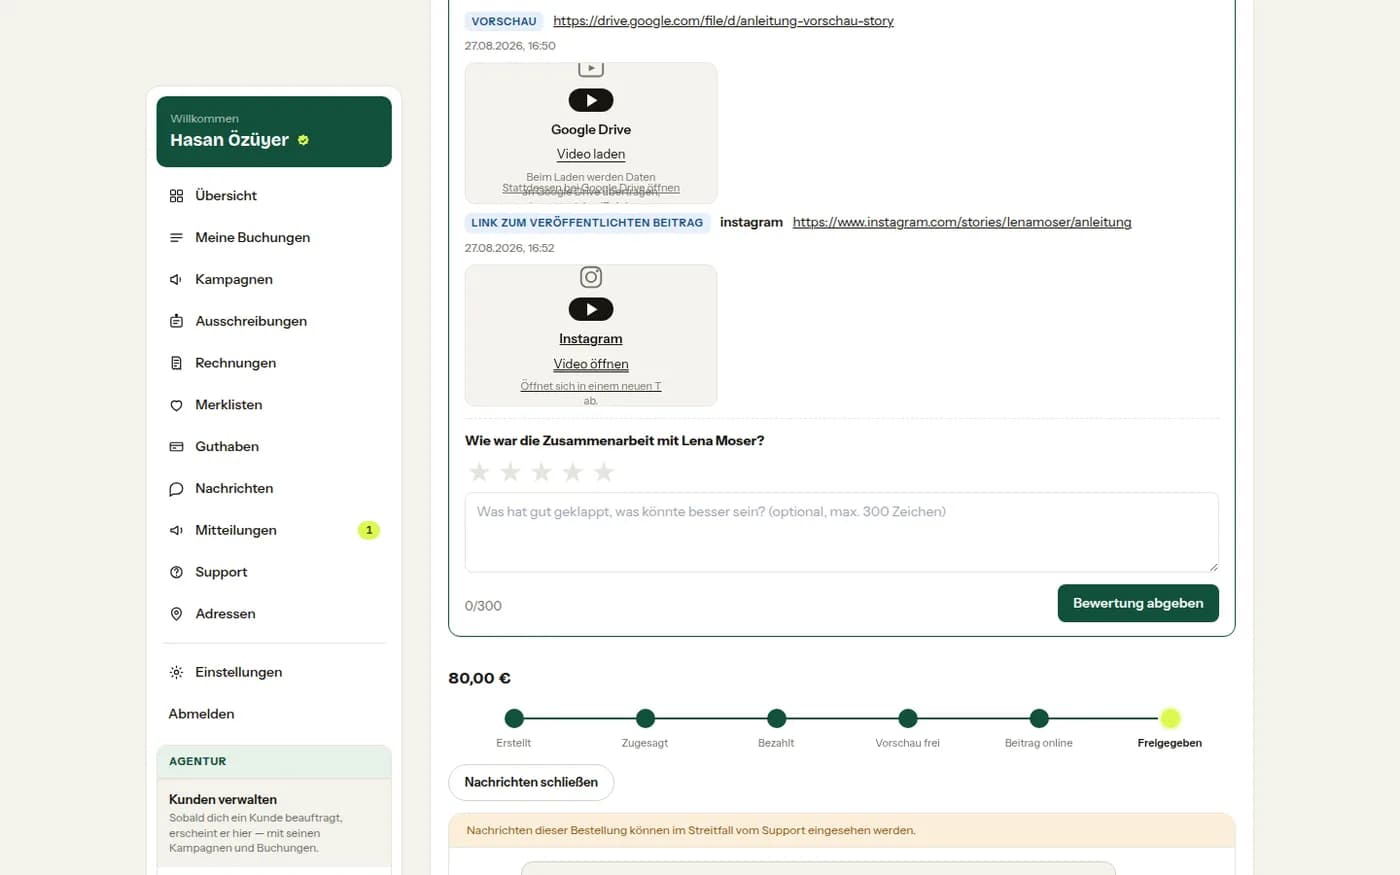
الاكتمال والتقييم
بعدها يظهر الحجز «معتمد». الروابط المسلّمة تبقى، ويمكنكم تقييم المبدع بالنجوم وبضعة أسطر.
8. قبول الخدمة
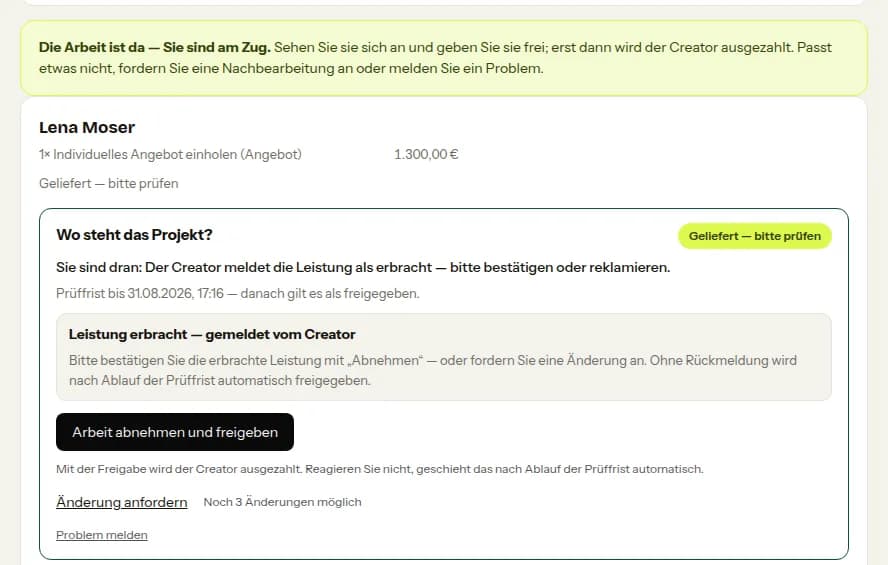
ليس كل حجز ينتهي بمنشور. في الاستشارة أو جلسة التصوير أو الموعد الميداني لا معاينة ولا رابط: يبلغ المبدع أن الخدمة قُدمت.
الخطوة 8.1
اعتماد أو اعتراض
في حالة المشروع يكتب «الخدمة مقدمة — حسب إبلاغ المبدع»، وتحتها زر القبول. هنا أيضًا مهلة مراجعة. إن لم يناسب شيء فاطلبوا تصحيحًا أو أبلغوا عن مشكلة.
9. طلب عرض خاص
عندما لا تناسب أي باقة تسألون عن السعر. عندها يجري التفاوض: يسمي المبدع سعرًا، تقبلون أو تردون بعرض مقابل — حتى يُتفق أو يقطع أحدهما.
الخطوة 9.1
طلب عرض
في الملف فوق الباقات «طلب عرض خاص». الباقي يجري كطلب عادي: المهمة وحقوق الاستخدام والإرسال. السعر لم يُحدد بعد.

الخطوة 9.2
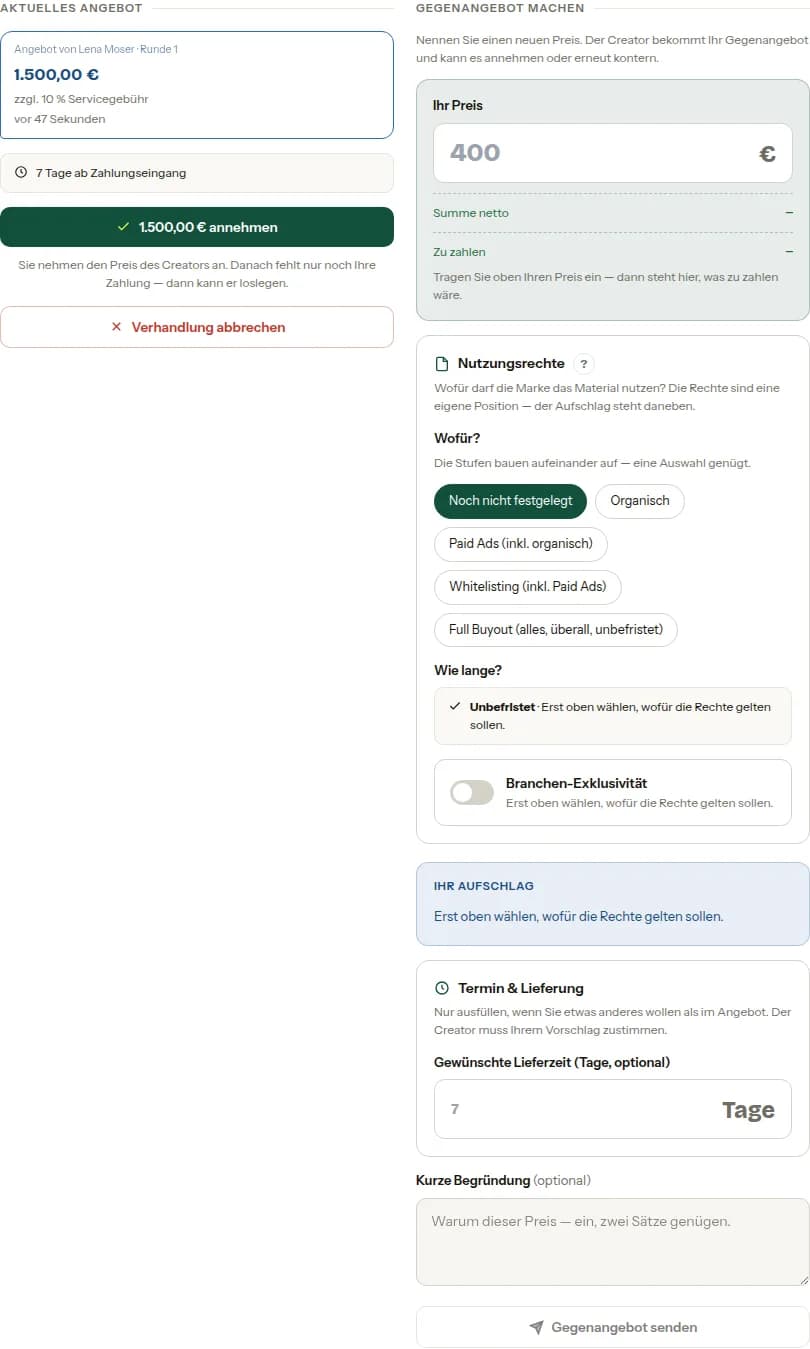
يصل عرض
على اليسار عرض المبدع بالسعر ورسم الخدمة ومهلة التسليم. تقبلونه — أو تنتقلون يمينًا للعرض المقابل. القطع ممكن في المكان نفسه.
الخطوة 9.3
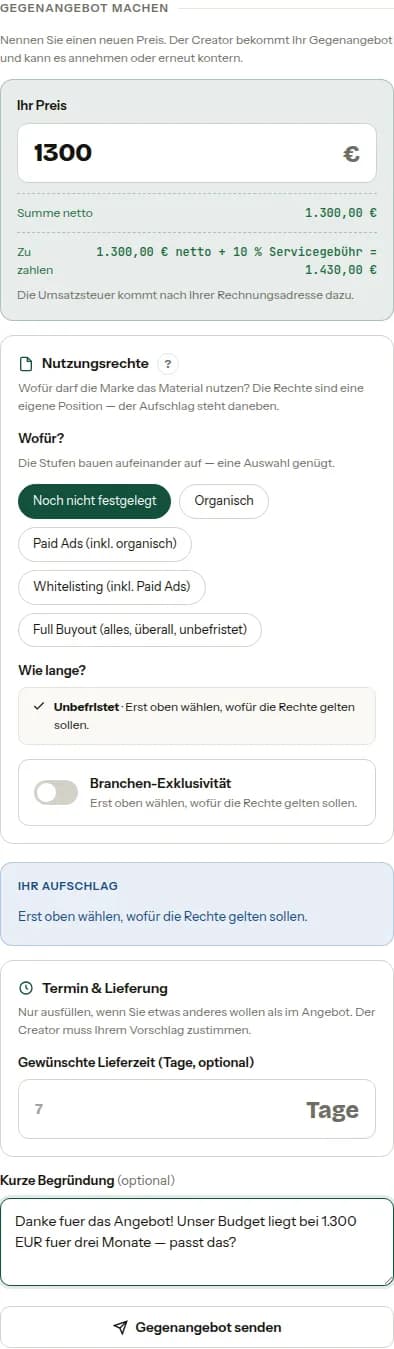
تقديم عرض مقابل
سعركم وحقوق الاستخدام المرغوبة وتعليل قصير. تحت الحقل مباشرة كم سيكون صافيًا ومع رسم الخدمة.
10. الإضافات
إن نشأ عمل أثناء المشروع يقدم المبدع إضافة. تتعلق بالحجز نفسه لكنها تُقرر وتُدفع على حدة.
الخطوة 10.1
قبول أو رفض
في الطلب ما تشمله الإضافة وكم تكلف. تقبلون وتدفعون — أو ترفضون. الحجز الأساسي لا يُمس.

11. عندما لا يناسب شيء
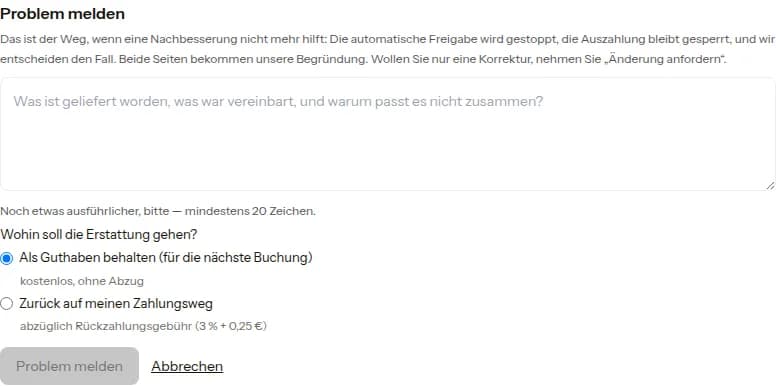
قبل الاعتماد أمامكم طريقان: طلب تعديل — لذلك عدد محدد من الجولات — أو الإبلاغ عن مشكلة. البلاغ يوقف الاعتماد التلقائي ويجمد الدفعة حتى يقرر المشغل.
الخطوة 11.1
الإبلاغ عن مشكلة
صفوا ما سُلّم وما اتُفق عليه ولماذا لا يتطابقان. كما تختارون وجهة الاسترداد: كرصيد دون خصم، أو إلى وسيلة دفعكم وحينها بعد خصم رسم الاسترداد.
12. تمديد حقوق الاستخدام
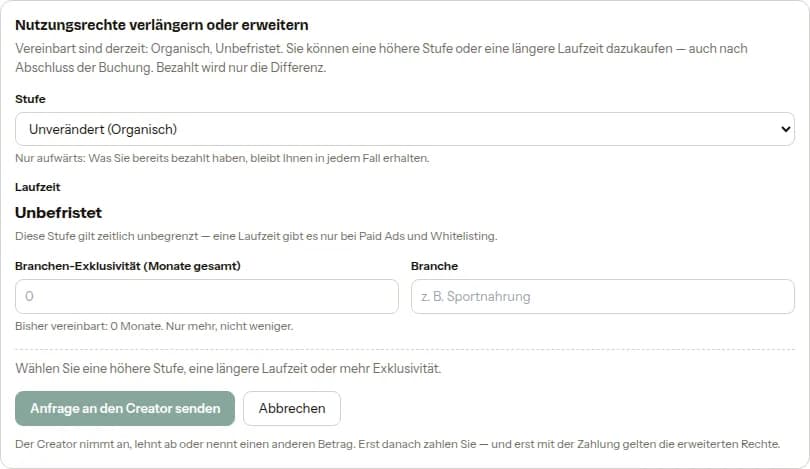
الحقوق قابلة للتوسيع لاحقًا: مستوى أعلى، مدة أطول، حصرية أكثر. صعودًا فقط — أقل من المتفق لا يجوز.
الخطوة 12.1
طلب إلى المبدع
في الحجز يوجد «تمديد حقوق الاستخدام أو توسيعها». تحددون ما تحتاجونه؛ يقبل المبدع وتُدفع الزيادة كإضافة. عبر «الحملات» تجدون المكان نفسه دون البحث عن الحجز المنفرد.
13. إعلان تعاون بست خطوات
بدل سؤال المبدعين فردًا فردًا تنشرون: تصفون ما تبحثون عنه ويتقدم المبدعون المناسبون. حتى الخطوة الأخيرة كل شيء مسودة — يُحفظ في الطريق ولا يُنشر إلا في النهاية.
الخطوة 13.1
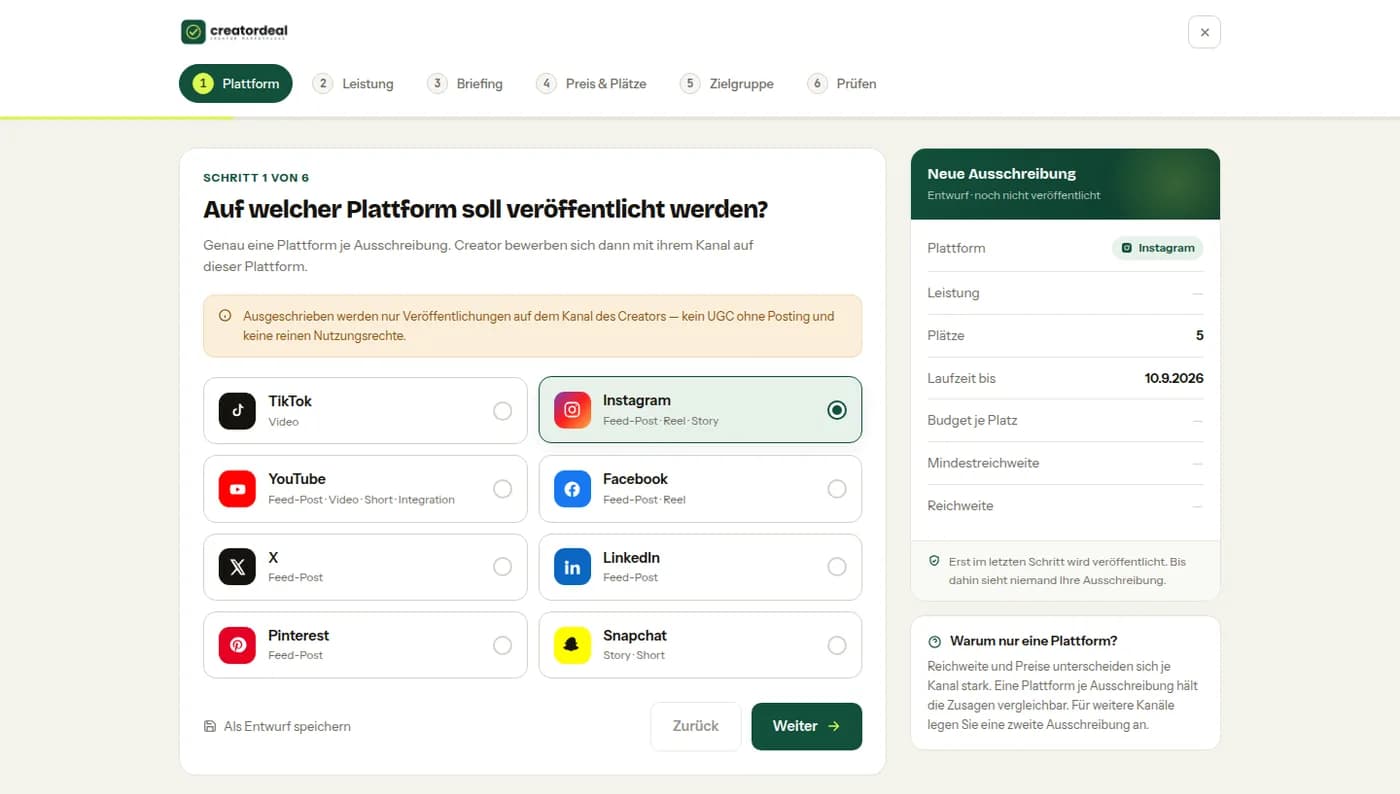
الخطوة 1: المنصة
إعلان التعاون يخص منصة واحدة بالضبط. يُطرح فيه نشر منشورات على قناة المبدع — أو مواد دون نشر: UGC أو صور أو موعد في الموقع.
الخطوة 13.2
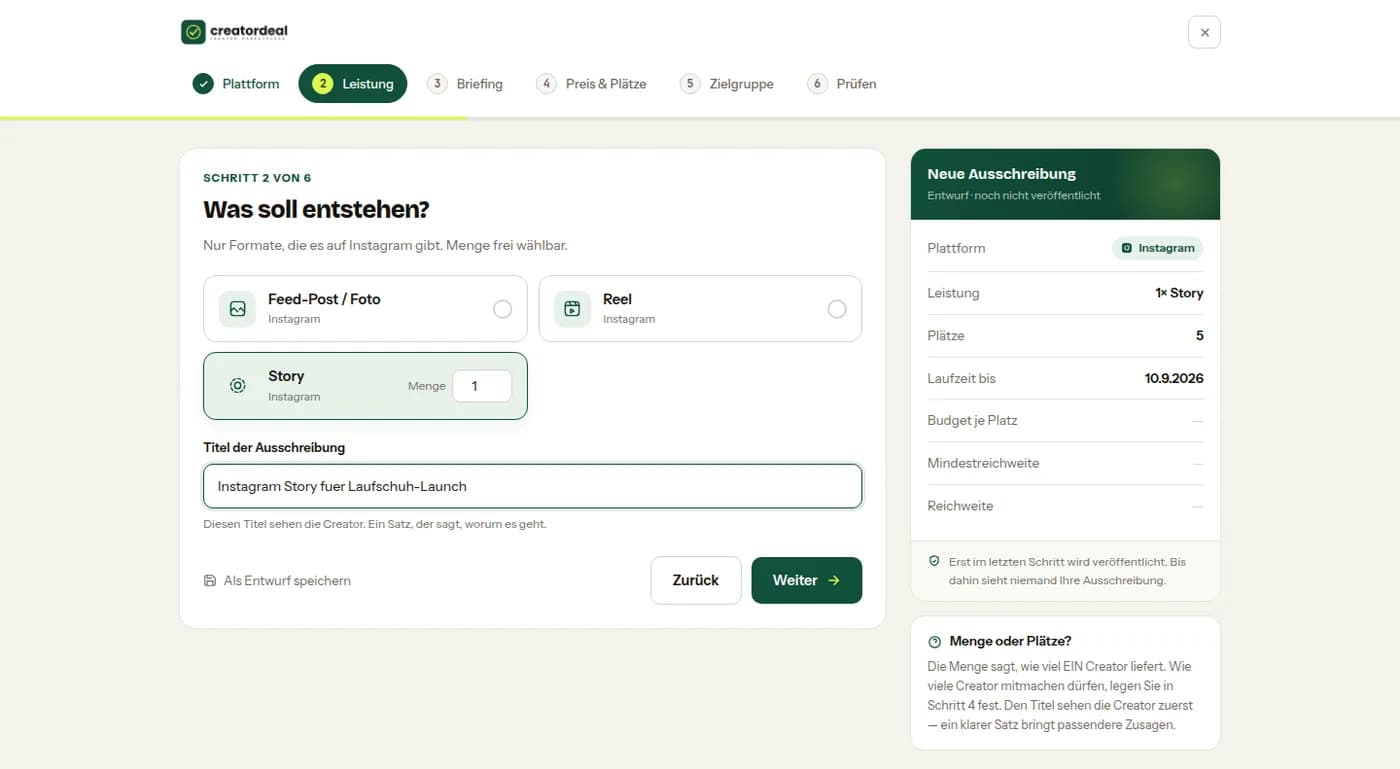
الخطوة 2: الخدمة
الصيغة — مثل منشور خلاصة أو ريلز أو ستوري أو UGC دون نشر —، وكذلك الكمية والعنوان. العنوان أول ما يقرؤه المبدعون.
الخطوة 13.3
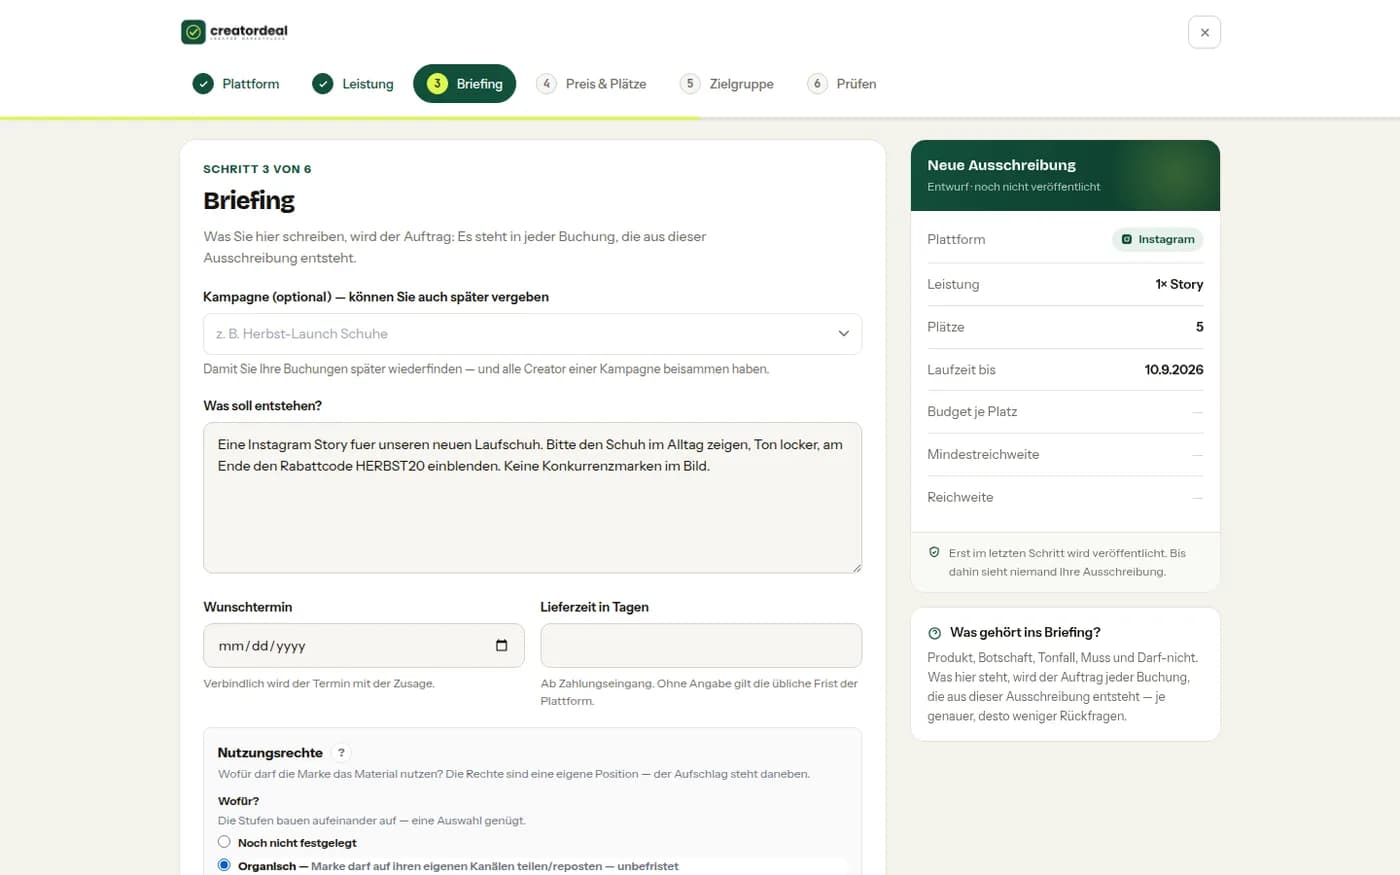
الخطوة 3: المهمة
ما الذي يجب أن ينشأ، الحملة اختياريًا، الموعد المرغوب ومهلة التسليم — وحقوق الاستخدام الواجب شمولها في السعر.
الخطوة 13.4
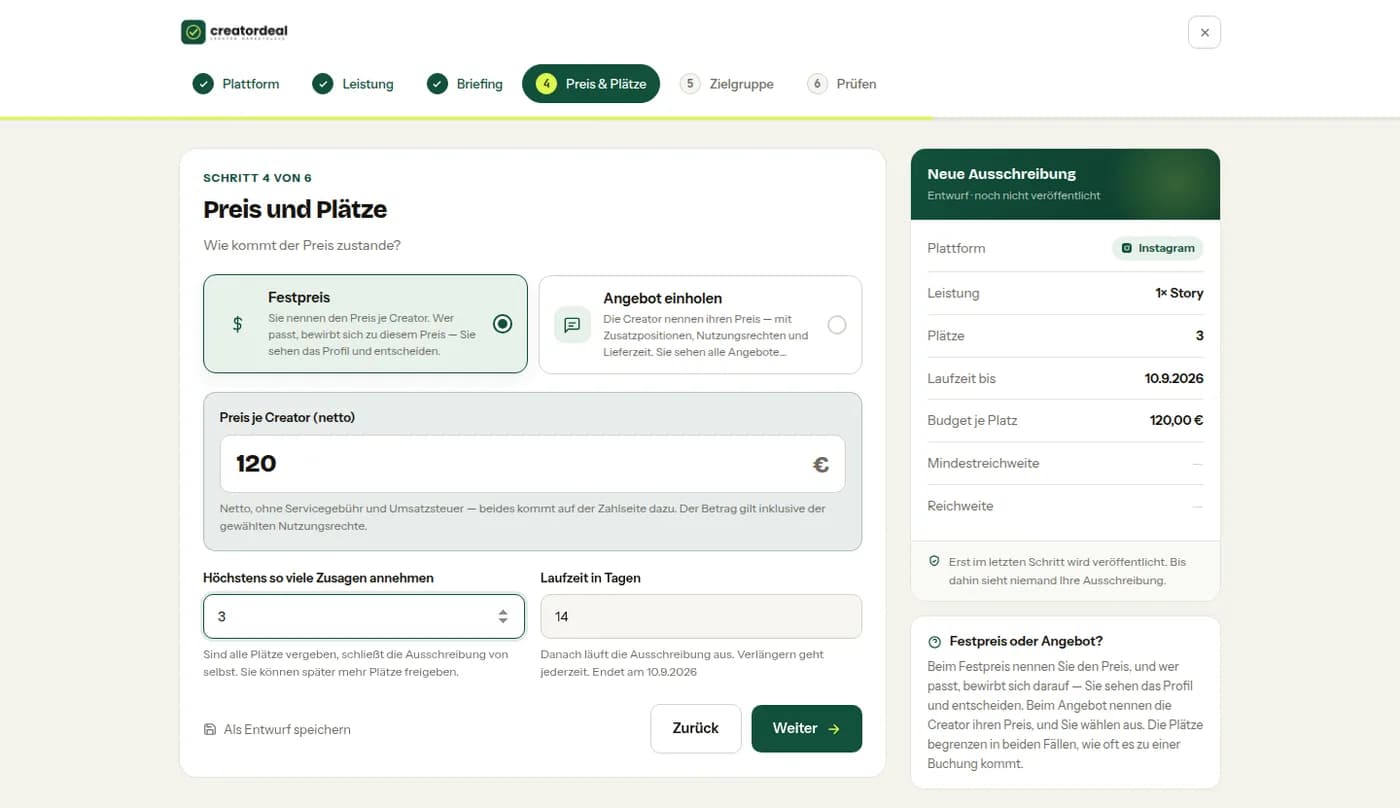
الخطوة 4: السعر والأماكن
سعر ثابت لكل مبدع أو جمع العروض. وكذلك كم موافقة تقبلون كحد أقصى وكم يستمر الإعلان؛ تاريخ الانتهاء مذكور أدناه.
الخطوة 13.5
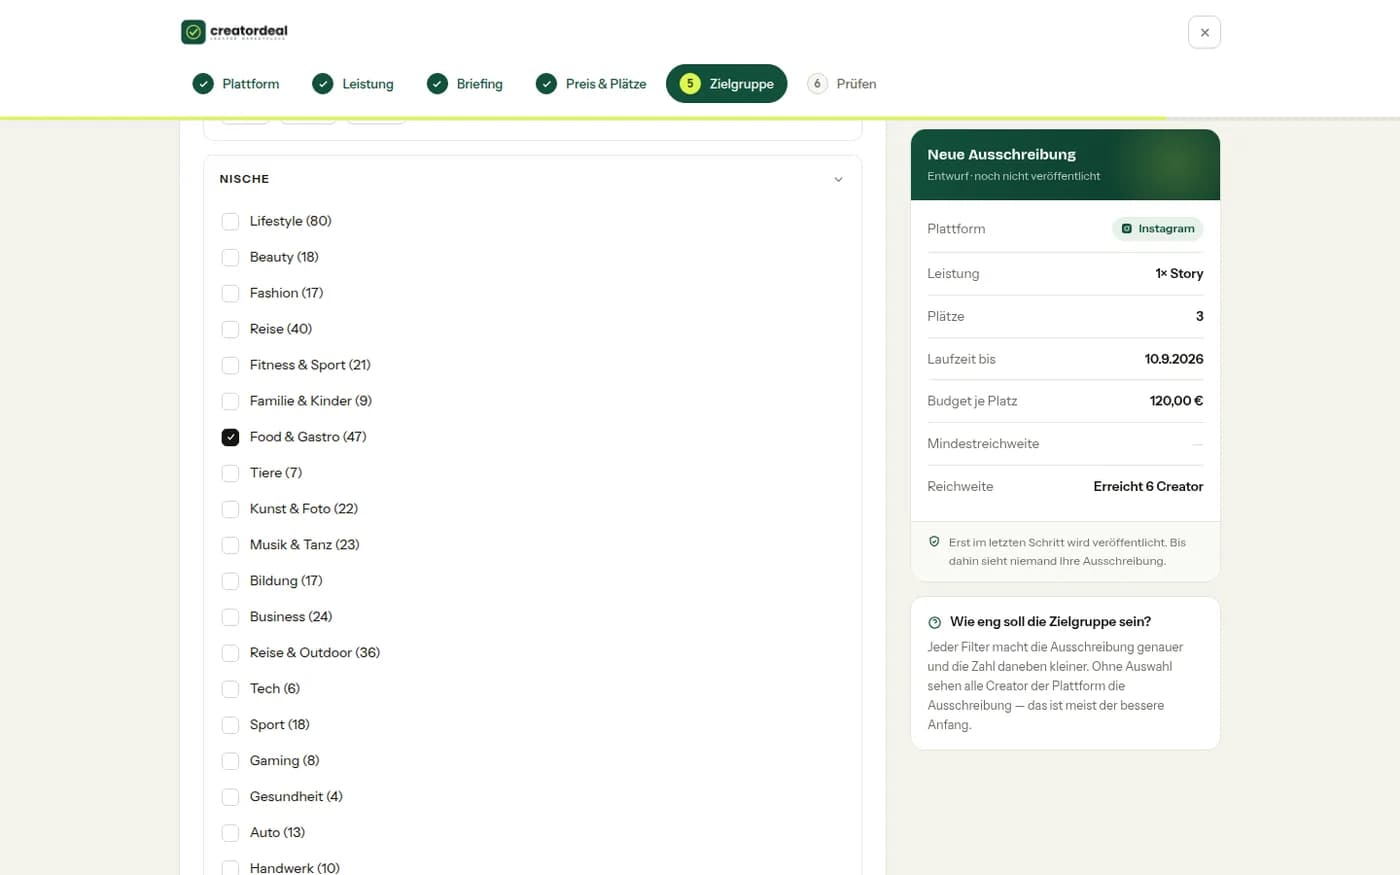
الخطوة 5: الجمهور المستهدف
المجال والبلد والوصول: هكذا تحددون من يرى الإعلان أصلًا. على اليمين كم مبدعًا يمكن الوصول إليه حاليًا — ضيقًا بما يكفي ليناسب، وواسعًا بما يكفي ليرد أحد.
الخطوة 13.6
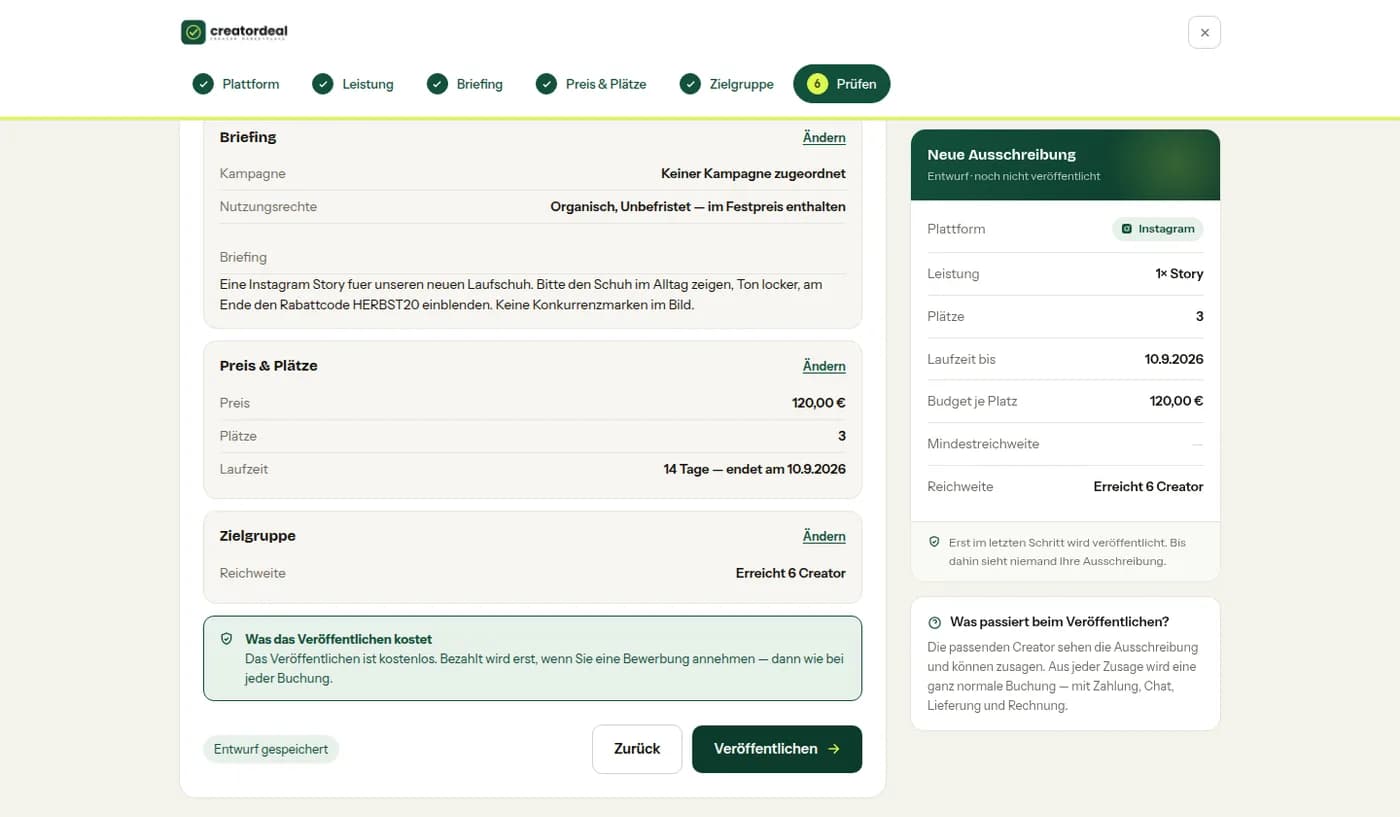
الخطوة 6: مراجعة ونشر
المهمة والسعر والجمهور مرة أخرى جنبًا إلى جنب، كل منها مع «تغيير». النشر نفسه لا يكلف شيئًا؛ لا تدفعون إلا لما تقبلونه.
14. الطلبات والدفع الجماعي
الإعلان الجاري يجمع الطلبات. تقبلون ما يناسب — والدفع جماعي عند إغلاق الإعلان.
الخطوة 14.1
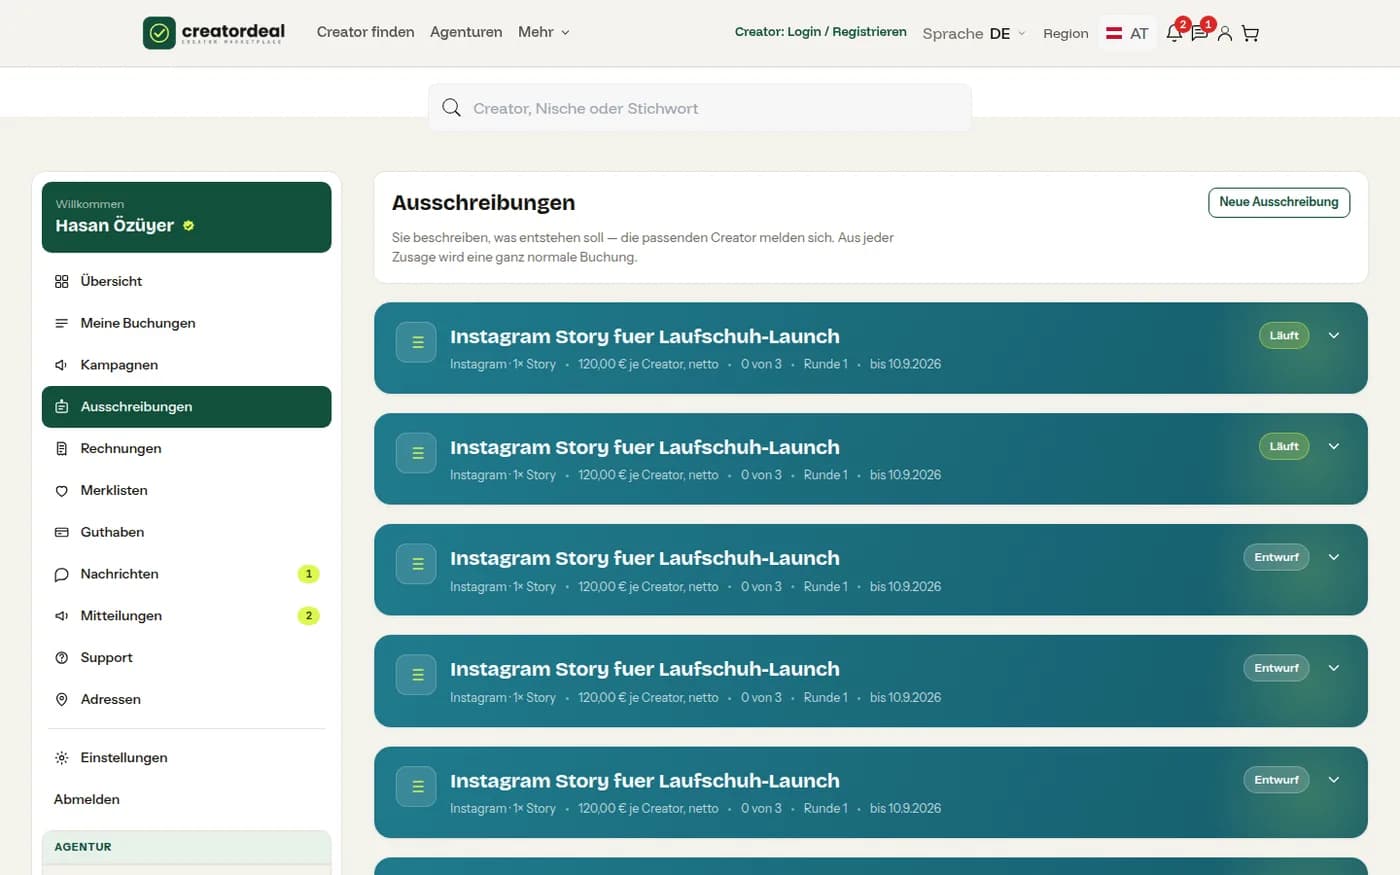
إعلاناتكم
في «إعلانات التعاون» المسودات والإعلانات الجارية مع المنصة والصيغة والسعر لكل مبدع والأماكن المشغولة وتاريخ الانتهاء.
الخطوة 14.2
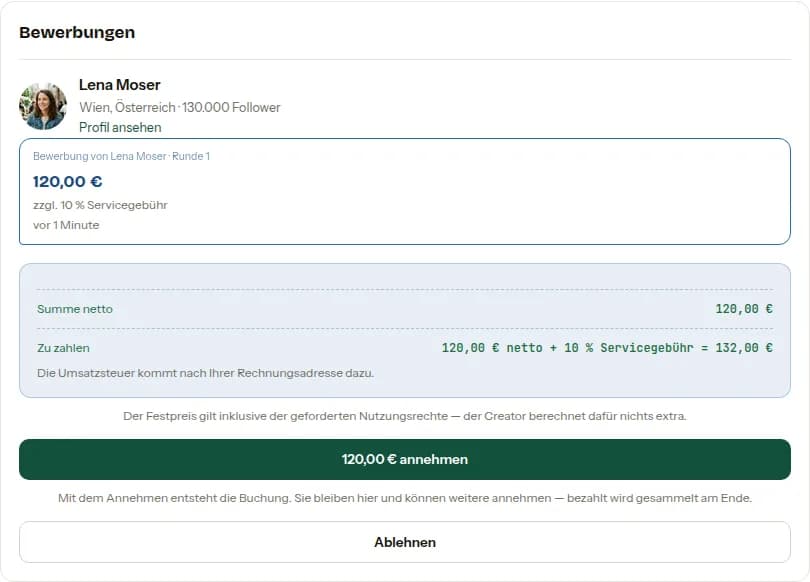
قبول الطلبات
لكل طلب ترون المبدع ووصوله وسعره مع رسم الخدمة. بالقبول ينشأ حجز؛ وتبقون في الإعلان ويمكنكم قبول المزيد.
الخطوة 14.3
الدفع جماعيًا في النهاية
ما دام الإعلان جاريًا لا تجري مهلة دفع. «إغلاق الإعلان والدفع» يحول كل الموافقات إلى دفعة واحدة.

15. الحجوزات والحملات
نظرتان على العمليات نفسها: قائمة كل الحجوزات — والحجوزات نفسها مجمعة حسب الحملات.
الخطوة 15.1
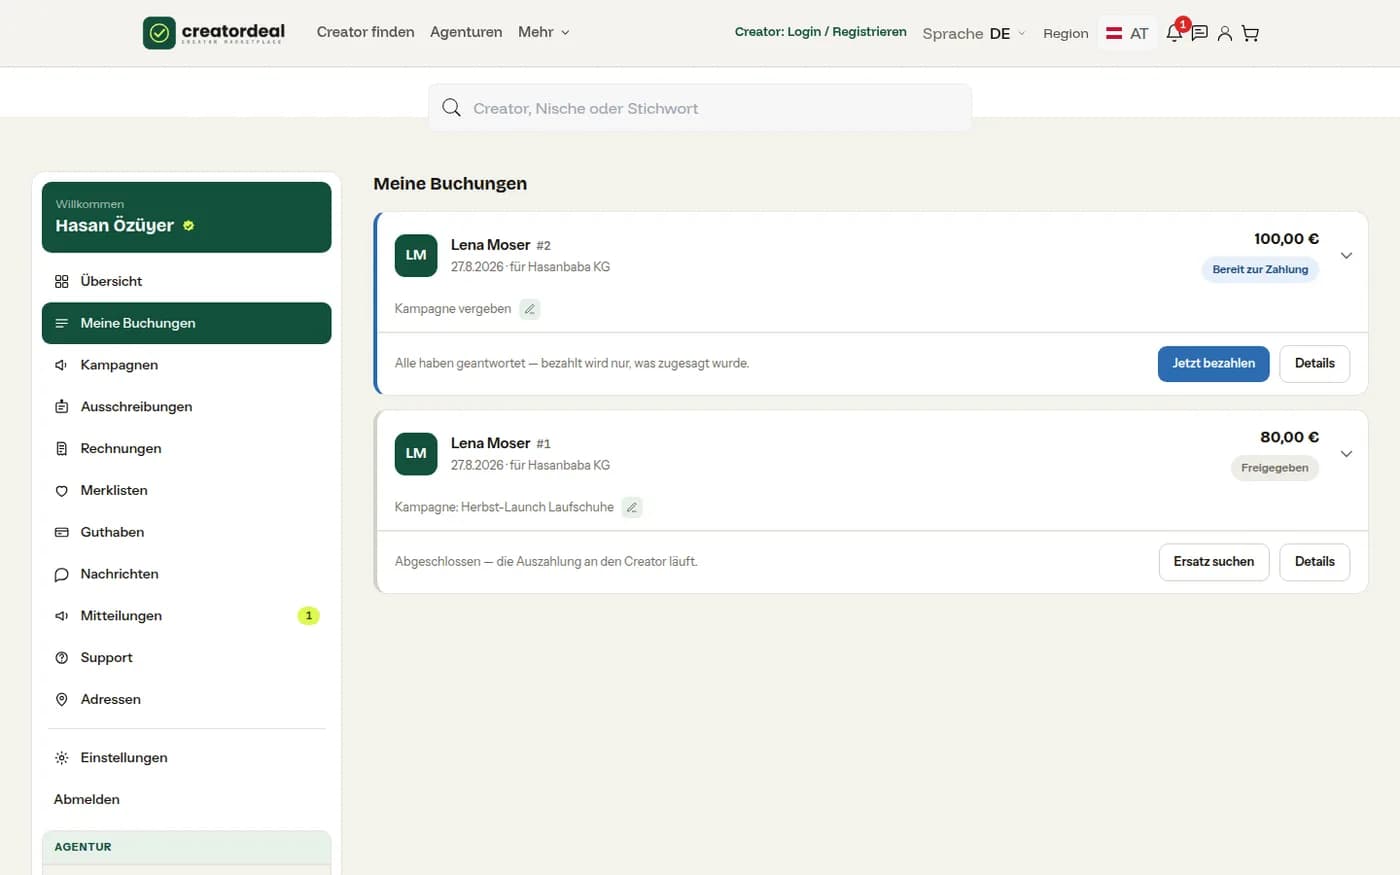
حجوزاتي
في البطاقة المبدع والرقم والتاريخ والمبلغ والحالة، والخطوة التالية كزر: دفع، اعتماد، تفاصيل. من هنا تسندون الحملة لاحقًا أيضًا.
الخطوة 15.2
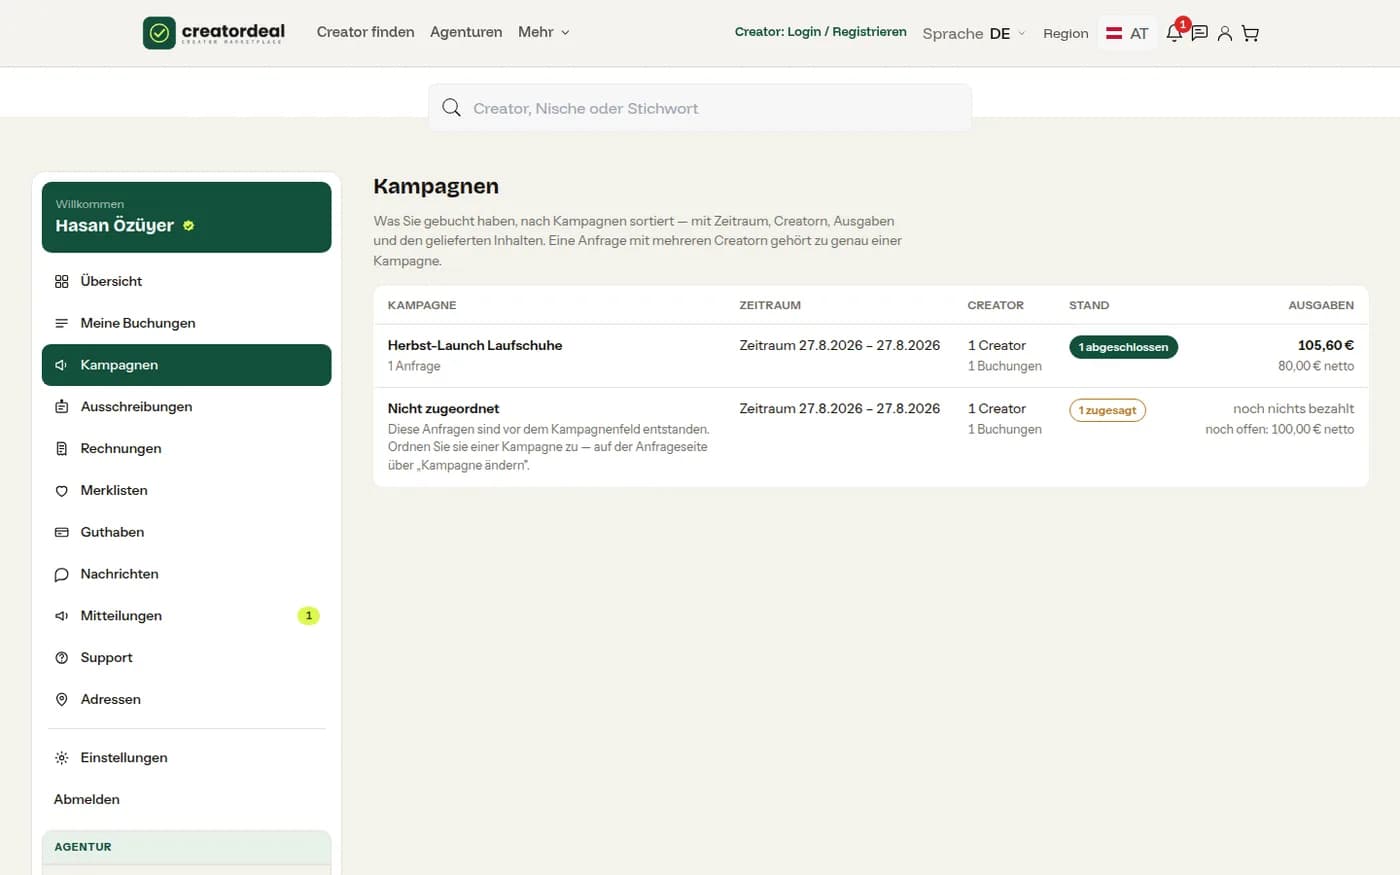
الحملات
لكل حملة الفترة وعدد المبدعين وعدد الحجوزات والتكاليف — إجمالية وصافية. ما لا ينتمي لأي حملة يظهر أسفلها صفًا مستقلًا.
16. قوائم الرغبات
حفظ المبدعين، الترتيب، التنسيق مع الزملاء — ومن قائمة واحدة طلب من الجميع دفعة واحدة.
الخطوة 16.1
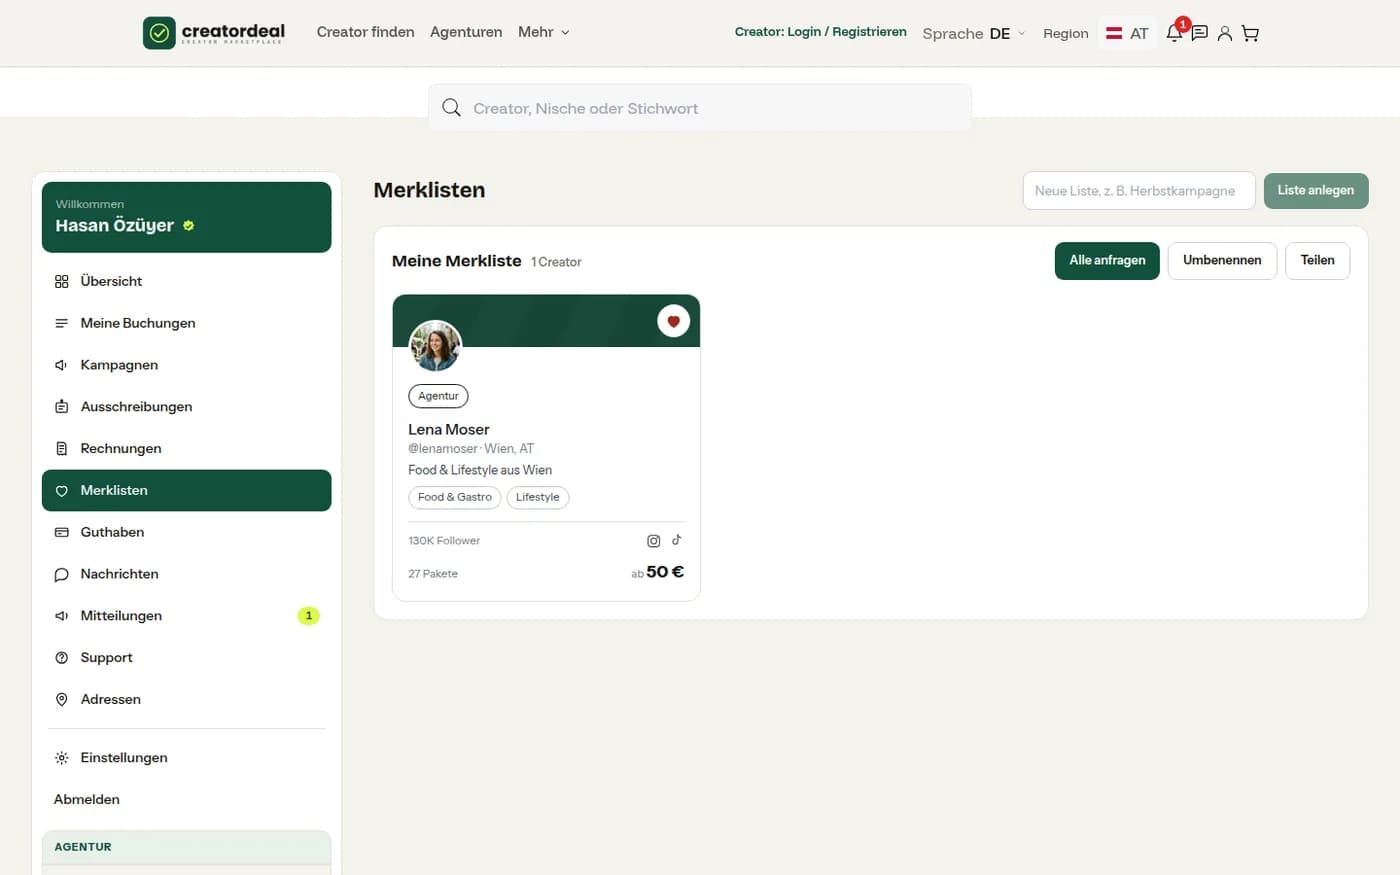
إنشاء القوائم
لكل قائمة اسمها الخاص؛ وعدد القوائم التي يمكنكم إنشاؤها مذكور عند باقتكم (Free: قائمة واحدة). «طلب من الجميع» يضع القائمة كلها في طلب واحد.
الخطوة 16.2
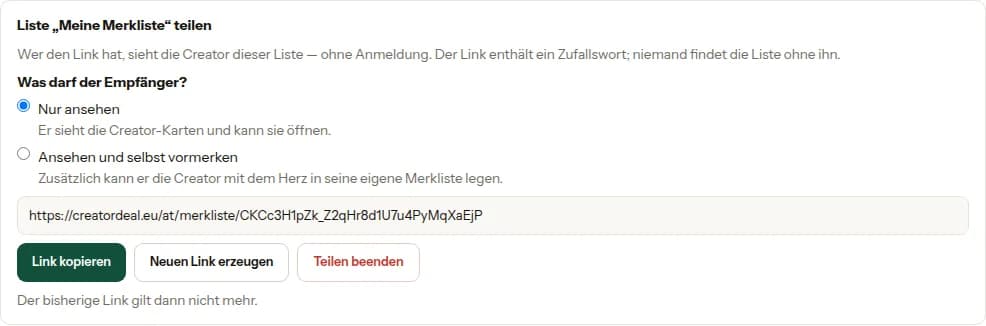
مشاركة القائمة
من يملك الرابط يرى مبدعي القائمة بلا تسجيل دخول. أنتم تقررون إن كان المستلم يشاهد فقط أو يضيف بنفسه أيضًا؛ ويمكن توليد الرابط من جديد أو تعطيله كليًا.
17. الفواتير والرصيد
المستندات والمال في مكان واحد. نصدر الفاتورة فور تسجيل الدفع — والرصيد ينشأ من الاستردادات.
الخطوة 17.1
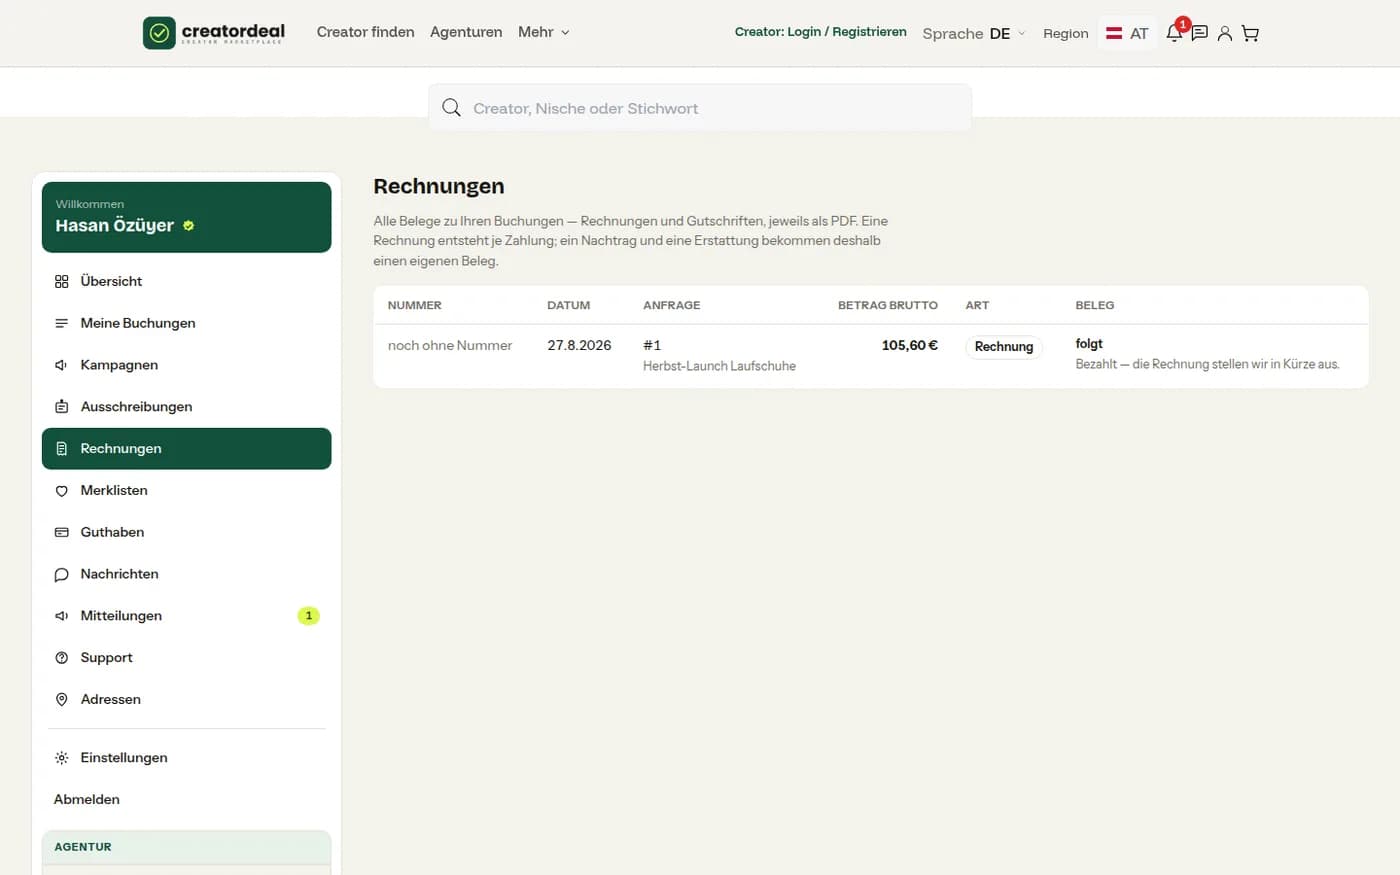
الفواتير
في الصف الرقم والتاريخ والطلب والمبلغ الإجمالي والنوع. ما دامت الفاتورة قيد الإنشاء يكتب في العمود الأخير «قريبًا»؛ بعدها يوجد المستند للتنزيل.
الخطوة 17.2
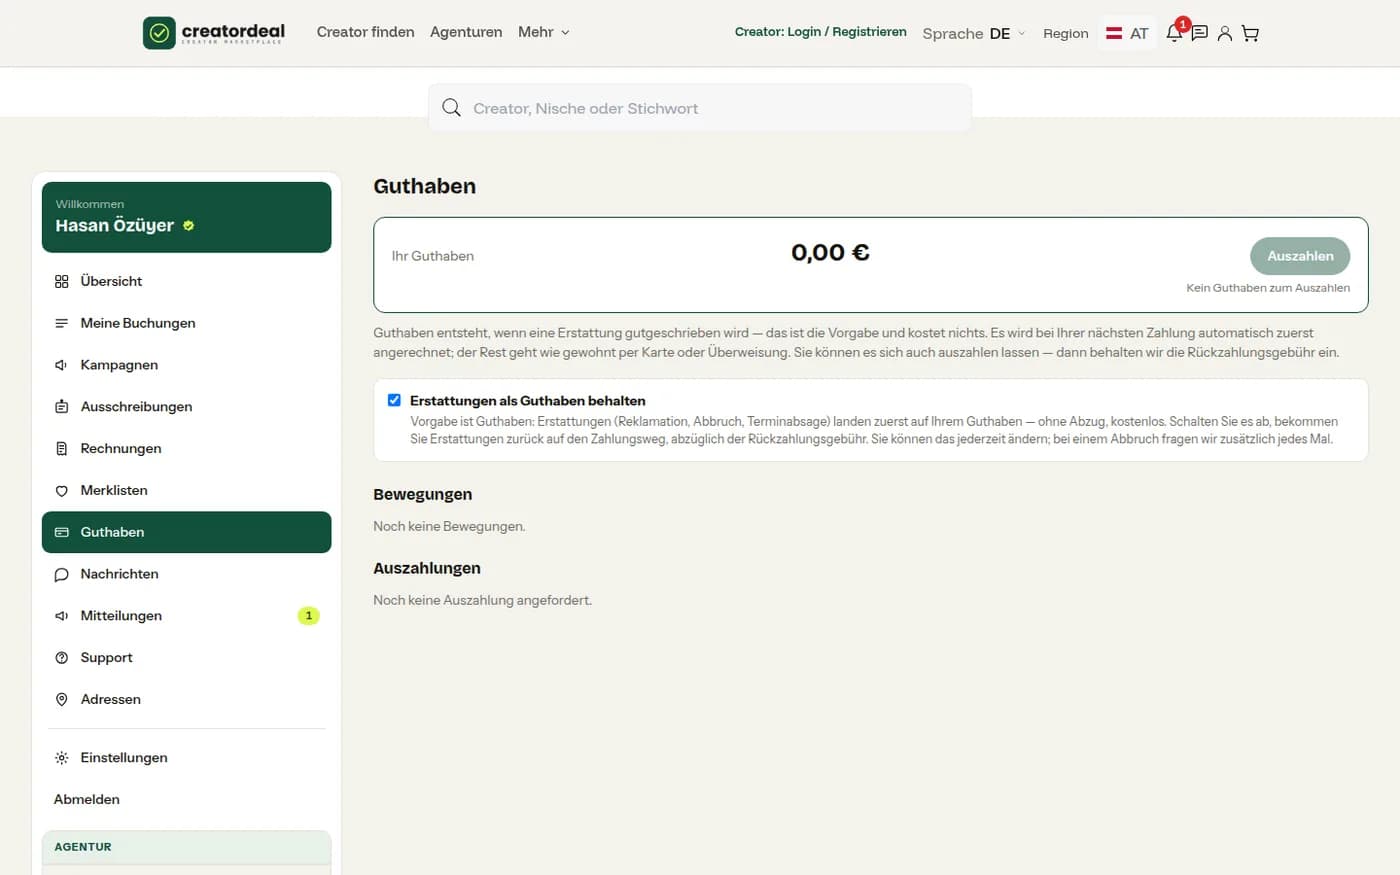
الرصيد
الاستردادات يمكن أن تبقى رصيدًا — دون خصم — أو تعود إلى وسيلة دفعكم. المفتاح أدناه يحدد الافتراضي مستقبلًا؛ وكل حركة في القائمة.
18. بضاعة إلى المبدع
إن أرسلتم عينة منتج يحصل الحجز على بند ثانٍ بجانب الخدمة. في الدفع تدخلون قيمة البضاعة وتكاليف الشحن: هذا المبلغ هو الساري إن قبل المبدع البضاعة ولم يسلّم.
الخطوة 18.1
تعليم الإرسال
بعد تأكيد الدفع يوجد في الطلب خانة «بضاعة إلى المبدع». فور أن يكون الطرد في الطريق تدخلون رقم الشحنة — اختياري — وتضغطون «أُرسلت البضاعة». يُبلَّغ المبدع.

الخطوة 18.2
الاستلام والإرجاع
بتأكيد المبدع وحده تجري مهلة تسليمه؛ ودون تأكيد تعد البضاعة مستلمة بعد أيام. إن لم يسلّم وجب عليه إعادتها غير مستعملة وعلى نفقته. إن وصلت تؤكدون ذلك في المكان نفسه؛ وإلا نحتسب المبلغ من دفعاته.

19. الإعدادات والعناوين والوكالات
ثلاثة مواضع يُضبط فيها حسابكم نفسه.
الخطوة 19.1
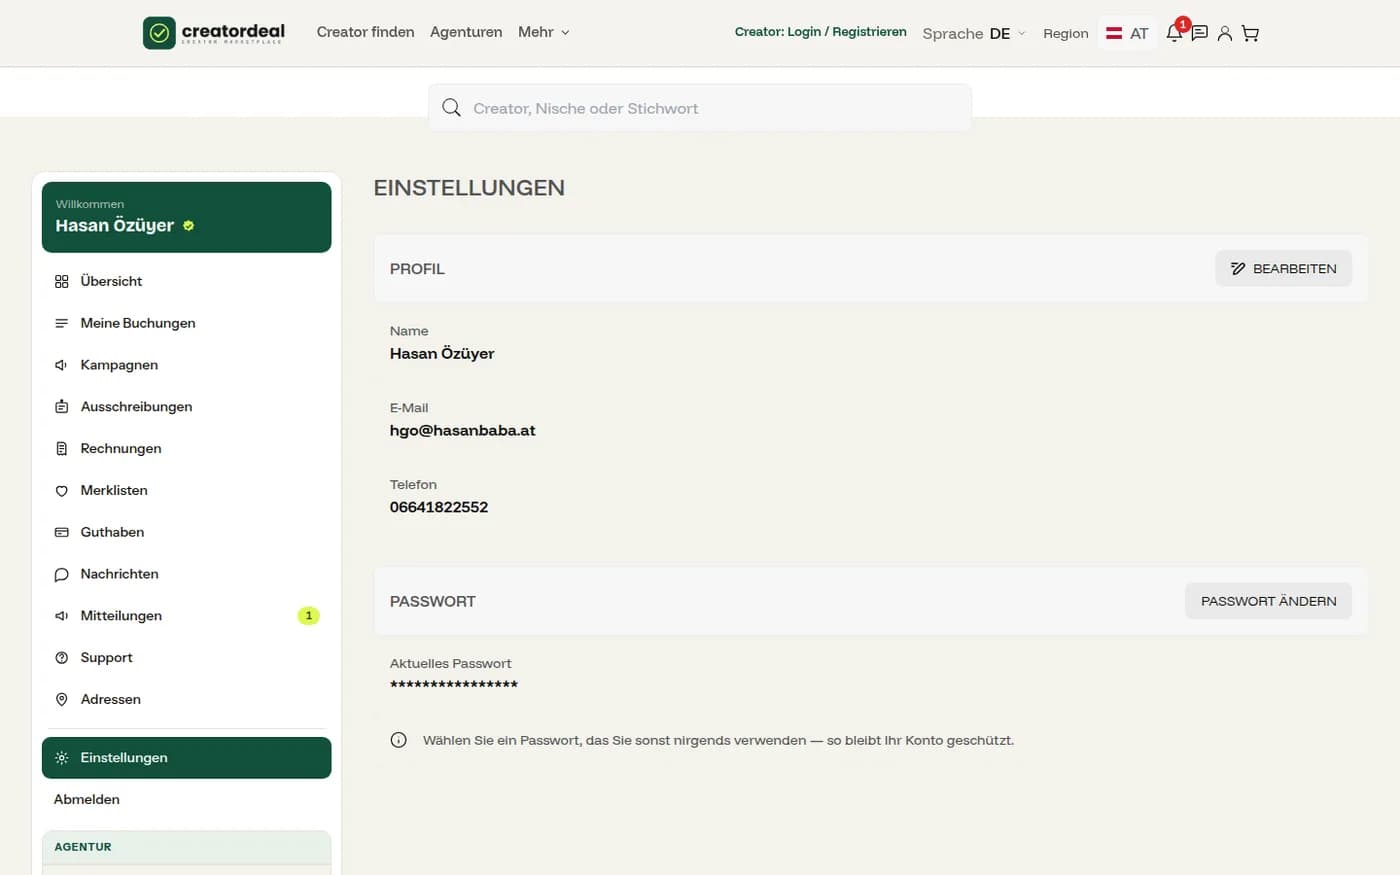
الملف وكلمة المرور
الاسم والبريد والهاتف تغيرونها في «الإعدادات»؛ كلمة المرور في بطاقة مستقلة أدناه.
الخطوة 19.2
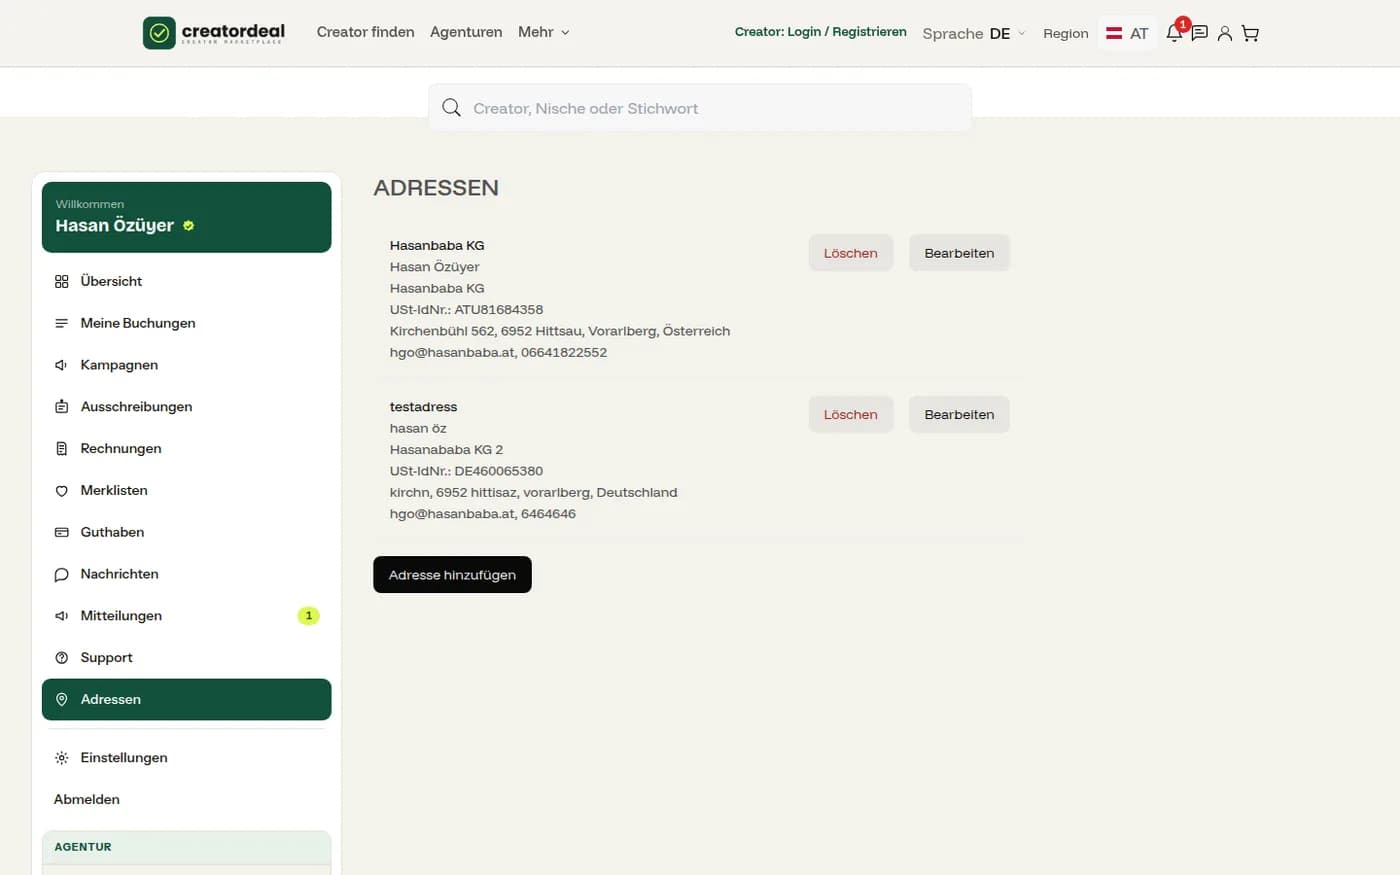
العناوين
عناوين الفواتير باسم الشركة والرقم الضريبي. أحدها محدد مسبقًا في الدفع؛ وعليه تُحسب ضريبة القيمة المضافة.
الخطوة 19.3
وكالاتي
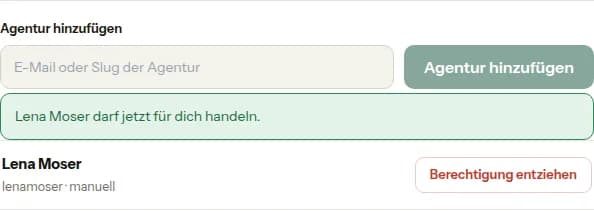
هنا تمنحون وكالة إذن الحجز باسمكم — عبر بريدها أو معرّفها. السحب ممكن في أي وقت؛ والحجوزات الجارية لا تُمس.